

2.28.26 Update
The latest version of Azure CLI (2.83.0) now includes the az cognitiveservices account project commands, so those can be used to create Foundry Projects following a much more "out of the box" approach. Here is Microsoft's documentation; the following should replace the workarounds described in the "Scripts" section below.
az cognitiveservices account create --resource-group "<your-resource-group-name>" --name "<your-foundry-name>" --location "<your-region-name>" --custom-domain "<your-foundry-name>" --kind "AIServices" --sku "S0" --query "id" --output "tsv" --allow-project-management "true" --assign-identity --yes;az cognitiveservices account project create --resource-group "<your-resource-group-name>" --name "<your-foundry-name>" --location "<your-region-name>" --project-name "<your-project-name>" --description "<your project description>" --display-name "<your project name>";
Introduction
Microsoft Foundry continues to cement itself as the foundation of my AI work. I can orchestrate agents and workflows against the latest LLMs in my Azure apps without abandoning the Microsoft ecosystem upon which I have built my .NET career. It is very satisfying to be able to create AI experiences leveraging the architectures, tools, platforms, and best practices that I’ve been refining for decades now.
Part of this development paradigm is being able to deploy my infrastructure to a resource group and automatically promote it up to production without having to manually configure anything in Azure. As Foundry matures, I have been able to leverage it more and more as a proper architectural component and derive greater value from it beyond merely playing on the monkey bars of its AI playground.
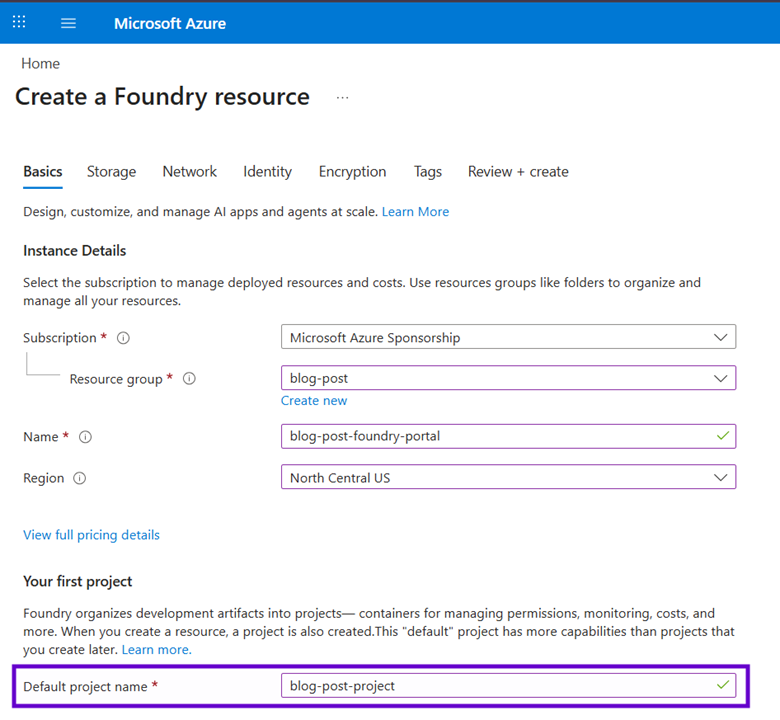
In this blog post, I’ll be covering the deployment side of Foundry as a PaaS resource via GitHub workflows, Bash, and Azure CLI. While this platform has a few different flavors, we’ll be focusing on Projects (not Hubs) in the “new” experience (which is still in preview; you can turn it on in the browser when navigating to the Foundry Portal per the purple box on the right in the screenshot below).

TL;DR: I will be diving deep into both the technical and philosophical aspects of automating Azure deployments in general, using Foundry as the core example (plus describing the nuances specific to scripting its provisioning). If you are only interested in the code that makes it all work, then you can focus on the “GitHub Workflow” and “Scripts” sections below.
PaaS Me Some Foundry
I'd like to start by laying some architectural groundwork. Any Foundry instance is its own PaaS resource in a resource group. However, there’s not much to do in Azure beyond configuring RBAC in the IAM blade and managing API keys and endpoints. In fact, all the AI work you will do in the new Foundry experience (deploying LLMs, building agents, configuring workflows, etc.) happens in a Foundry Project as its own separate PaaS component tied to a parent Foundry Portal.
(Note that Microsoft will refer to this “parent resource” as just “Foundry” in Azure, but I’ll be using the moniker “Foundry Portal” to better distinguish it from child “Foundry Project” instances.)
A useful comparison is to consider how Azure SQL servers and databases are provisioned in a resource group. The database is a separate PaaS component that is a “child” of the server’s instance. Once the server is up and running, I tend to interact with it only rarely (if ever); the database is where all the backend persistence effort is focused.
It’s the same deal with Foundry: once you have a Project provisioned, that’s where all your robots will live. In fact, just as SQL database PaaS instances are listed in a resource group as “[sql-database-name]([sql-server-name]/[sql-database-name]),” Foundry Project resources follow the same naming convention: “[foundry-project-name]([foundry-portal-name]/[foundry-project-name]).”

When you create a Foundry Portal instance manually via the Azure portal, you are required to provide the name for a default Project, ensuring the new experience has both PaaS components and therefore everything you need to start building agents and coding against them. As I mentioned with SQL Server, developers don’t interact with the “parent” resource; when navigating to the new Foundry Portal experience, you are always in the context of a “child” Project (seen in the redacted purple rectangle on the left in first screen shot of this blog post).
One of the really nice aspects of Foundry’s design is that a parent Portal instance makes all AI services available to its child Projects. We no longer have to provision (and manage API keys for) separate resources (Azure OpenAI, Document Intelligence, Vision, etc.); everything is in one place and you only pay for the compute, storage, and tokens your robots consume.
In summary, here is the physical structure of Foundry PaaS instances in a resource group. The bolded bullets are the components; other points represent the features they support. Note that Foundry Projects can have their own IAM, but so far I’ve only needed to configure security on their parent Portals.
- Resource Group
- Foundry Portal
- IAM
- API Keys
- AI Services
- Azure OpenAI
- Document Intelligence
- Etc.
- Foundry Project
- Models
- Agents
- Workflows
- Project API to integrate with AI apps
- (Additional Foundry Projects as needed for separate "AI tenants")
- Foundry Portal
GitHub Workflow
Note: this YML file described below is hosted here.
With an understanding of what we need to deploy, we can now discuss how to do it. I’m going to assume that you’ve been around the Azure CLI block a few times and have some experience leveraging it in a GitHub Action workflow via a Bash script; the basics of this approach are outside the scope of this blog post. However, I’ll go into as much detail as possible for the Foundry-specific bits.
The sections below will break out the separate pieces we need to build in order to provision a Foundry Portal and Project to a resource group with an LLM model deployment so you can adapt the bits you need to your specific infrastructure requirements and immediately start your AI work. Note that each Foundry user will have to manually opt into the new experience for themselves in the browser as discussed at the start of the blog post; that can’t be managed centrally.
Let’s start with the YML file that serves as the infrastructure workflow invokable as a GitHub action. As a principle, infrastructure automations should be “idempotent,” following a pattern of “create if and only if it does not exist” for each resource to be provisioned. I prefer using Azure CLI over Bicep or ARM templates to this end, since scripts with procedural logic provide more readability, debuggability, and fine-grained control than massive JSON files.
Furthermore, I always recommend that infrastructure workflows be operated manually via a workflow_dispatch trigger instead of after a pull request or push. While changes to the deployment bits should of course always be PR-ed, my preference is to not be constantly touching my resource groups every time new code is committed. Even though the idempotency adds a layer of protection against breaking Azure, CLI scripts can be long running and destructive, so I try to guard their executions with care.
name: Foundry Infrastructure Deployment
run-name: Foundry Infrastructure Deployment [${{ inputs.target-environment }}]
on:
   workflow_dispatch:
    inputs:
      target-environment:
        type: choice
        default: Dev
        required: true
        description: The target Azure resource group environment.
        options:
          - Dev
          - UAT
          - Prd
      resource-group-name-prefix:
        required: true
        default: <your-prefix-here>
        description: The prefix for all Azure resource group names. PaaS components will have the lowercase-ed name[prefix]-[environment]-[resource name].
      region:
        required: true
        default: northcentralus
        description: The main Azure region used for PaaS components.
      deployment-entra-enterprise-app-object-id:
        required: true
        default: <your-deployment-app-object-id-here>
        description: The object id of the Entra Enterprise Application (NOT the associated app registration's app id) used to provision PaaS components and other Azure infrastructure.
      foundry-sku:
        default: S0
        required: true
        description: The SKU of the Microsoft Foundry resource.
      foundry-portal-resource-name:
        required: true
        default: foundry01
        description: The name of the parent Foundry Portal resource.
      foundry-project-resource-name:
        required: true
        default: project01
        description: The name of the child Foundry Project resource.
      llm-name:
        required: true
        default: gpt-4.1
        description: The type of LLM AI model to use.
      llm-capacity:
        required: true
        default: 501
        description: The LLM capacity (in units of 100,000 tokens per minute).
      llm-version:
        required: true
        default: 2025-04-14
        description: The LLM API version.
permissions:
  id-token: write
  contents: read
jobs:
  deploy-infrastructure:
    name: Deploy Infrastructure
    runs-on: ubuntu-latest
    steps:
      - name: Checkout Branch
        uses: actions/checkout@v4
      - name: Azure CLI Login
        uses: azure/login@v2
        with:
          creds: ${{ secrets.AZURE_DEPLOYMENT_CREDS }}
- name: Deploy Foundry
  uses: azure/cli@v2
  with:
    azcliversion: latest
    inlineScript: |
            #ensure script is executable
            chmod +x$GITHUB_WORKSPACE/deployment/foundry.sh;
            #execute script
            $GITHUB_WORKSPACE/deployment/foundry.sh\
              "${{ github.event.inputs.target-environment }}" \
              "${{ github.event.inputs.resource-group-name-prefix }}" \
              "${{ github.event.inputs.region }}" \
              "${{ github.event.inputs.deployment-entra-enterprise-app-object-id }}" \
              "${{ github.event.inputs.foundry-sku }}" \
              "${{ github.event.inputs.foundry-portal-resource-name }}" \
              "${{ github.event.inputs.foundry-project-resource-name }}" \
              "${{ github.event.inputs.llm-name }}" \
              "${{ github.event.inputs.llm-capacity }}" \
"${{ github.event.inputs.llm-version }}";At the highest level, this workflow accepts ten input parameters (which is actually the max you can have; it’s a painful GitHub limitation) and passes them to a pre-authorized Azure CLI Bash script that runs on Linux. This is a rare departure from the pure Microsoft stack I prefer to perch upon, but useful here since Bash is friendlier than PowerShell in GitHub actions.
Hopefully the descriptions of each parameter above are sufficient, but here are a few developer notes for this workflow:
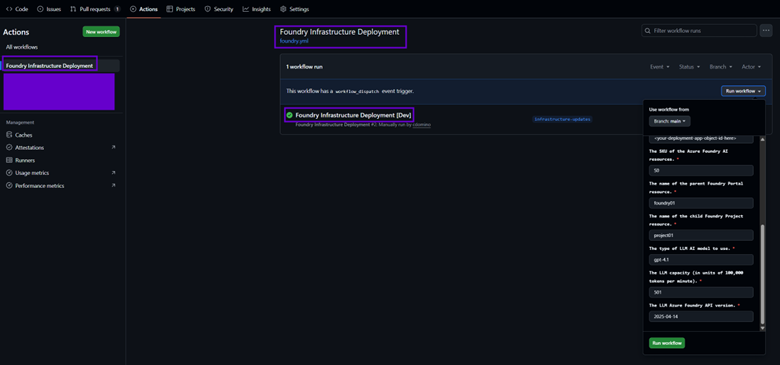
1) The “name” is what shows up under the “Actions” tab in your GitHub repository, while “run name” is what is displayed for each workflow invocation, dynamically showing which environment it was executed against. The screen shot below also shows what the parameter inputs look like should you need to override their default values on a particular run.
2) This deployment expects the following structure in your branch:
- [root folder]
- /.github
- /workflows
- foundry.yml (these folders are provisioned for you when creating an action via the “New workflow” button)
- /workflows
- /deployment
- foundry.sh
- utilities.sh
- /.github
3) You will need to create the Entra ID app registration that Azure CLI uses to authenticate.
- This service principal requires broad access to Azure (in the real world, I use it for everything: creating resource groups and PaaS components, registering resource providers, provisioning and configuring other app registrations, etc.), so I typically grant it the following permissions:
- Contributor (subscription role)
- Cloud Application Administrator (app administrative role)
- Role Based Access Control Administrator (subscription role)
- Give it a client secret and note the value.
- It shouldn’t need any permissions, API scopes, or authentication configuration, but your requirements might differ if you expand the reach of this app’s utility.
4) Finally, you’ll need to create a GitHub secret to store the ids and credentials of this app registration in a JSON format that Azure CLI will use to communicate with Entra and your target subscription. The screen shot below shows how to get to this in your repo (you will need to be an administrator).

After clicking “New repository secret,” use the following values (making sure your JSON is properly formatted with no extraneous whitespace) and hit “Add secret” (GitHub might ask for your password first). This value will then be accessible in the YML file as: ${{ secrets.AZURE_DEPLOYMENT_CREDS }}

Bash
You can skip this section if you don’t need the following quick primer on Bash. In general, the idea is to keep the YML file as simple as possible, and push all procedural logic to custom scripts. This provides many developer quality of life features, including allowing us to execute these files directly from an authenticated local console while building out our project’s infrastructure.
If you’re still here, I will assume that, like me, you are coming to the table with a substantial cognitive investment in PowerShell. I’ve curated the following cheat sheet to help straighten out the steeper angles of the learning curve for us wayward Windows developers finding ourselves scripting in Linux:.sh files need a “shebang” at the top: #!/bin/bash
- You don’t need terminating semicolons in Bash (or PowerShell for that matter), but after over twenty years of .NET, I just can’t help but use them.
- Bash is a bit more cryptic than PowerShell, so Copilot will be your friend to translate logic between the two. Some things to watch out for in the code samples below:
if${variable,,}returns the lowercase string value of$variable.- When assigning variables, do not put a dollar sign on the lefthand side and do not put spaces around the equal sign.
- Correct syntax I will never get used to:
newValue="$oldValue with new text";
- Incorrect syntax examples:
$newValue="$oldValue with new text"; //leading $newValue = "$oldValue with new text"; //spaces around =
- Correct syntax I will never get used to:
- However, Bash is more forgiving than PowerShell in terms of escaping quotes (both single and double). For nesting strings, your best bet (in most cases) is to use outer double quotes and inner single quotes to not paper over variable values. This makes a lot of hand-crafted JSON easier to pass to Azure CLI commands.
- The utilities.sh script is filled with useful standalone Azure CLI functions (most of which are not discussed here). This is called from foundry.sh during deployments.
- To “reference” a “child” script, run this from the “parent” .sh file: source ./path-to-child-script/child-script.sh;
- Bash lacks the concept of a formal return statement. Instead, you echo out a string value. I’ve adopted a pattern where these functions “return” a pipe-delimited string that the caller can split apart and leverage (an example of this is below).
- Unfortunately, this means that you have to be careful creating variables and issuing console logs with echo in these functions since they share context with the calling script. To be safe, these variables are prefaced with the local keyword (avoiding conflicts with common names) and logs are redirected to standard error via the bolded bit below:
echo "This isn’t actually an error.">&2;
- But don’t worry; GitHub will harmlessly show these statements seamlessly alongside standard output from the froundry.sh script in the workflow logs without drawing any blood or throwing any exceptions.
- Script and function parameters are also “very different.” Arguments are not named (or even present) in method signatures and are not delimited with commas when invoking them. Instead, local variables named
$1,$2...${n}
Call a function with parameters (and split the resulting string):
1result=$(function_name "$parameter1" "$parameter2"); //no commas
2resultComponents=(${result//|/ }); //split $result on pipe
3returnValue1=${resultComponents[0]}; //indices also start at 0
4returnValue2=${resultComponents[1]}; //familiar array syntax
Mapping parameters (IN ORDER) to named variables in the callee:
1function function_name() //best practice is to use underscores
2{
3  #initialization
4  local parameter1=$1; //no named parameters
5  local parameter2=$2; //order matters!
6  . . .
7  local parameter10=${10}; //after 9, you need to use braces
8  . . .
9  #return
10  echo "$returnValue1|$returnValue2"; //no >&2
11}
In line #10 above, we return a single string from the callee function call without using >&2 to redirect it to the error output. This also keeps the value out of standard output (so it won’t be logged in GitHub) and the caller function will assign it to the variable on the lefthand side of the method invocation.
Finally, let me describe some additional considerations when using the Azure CLI for automated deployments:
- In Bash, all
azcommands are wrapped in$();constructs like function invocations. - When querying Azure, I always end my Azure CLI calls with
--query "…"--output="tsv"
What I found interesting when getting started with automated Foundry provisioning is that Microsoft didn’t introduce something new like az foundry as a CLI extension. Instead, all Azure AI components still live under az cognitiveservices account; to get a Foundry instance, you just give the --kind parameter a value of “AIServices” (which makes migrating to Foundry from previous AI PaaS deployment much easier).
Infrastructure Idempotency
Before getting into the code, I wanted to double click on the idempotency points made earlier. Except for some simple helper methods, each function in utilities.sh follows the pattern below to ensure an Azure component exists in a desired state, regardless of the current state of the target resource group.
- Initialize input variables and constants
- Check if the target resource exists
If not... (create case)
i. Provision it
ii. Perform “one time” initial set up - Configure the target resource every time (update case)
- Return properties of the target resource
This approach satisfies my core infrastructure goal of having 100% automated Azure deployments while accommodating changes along the way. In this section, I’ll briefly touch upon the more “philosophical” aspects of using Azure CLI to achieve idempotent deployments that minimize downtime and mitigate risks caused by manual Azure configurations not finding their way up the environmental chain.
The first point has been covered in the “Bash” section above; just make sure to validate your parameters because Azure CLI errors might not halt the deployment, causing indeterminate behavior and potential resource group corruption. Next, to perform the check for #2 above, I use…
local result=$(az <command> list <parameters> –-query ". . ." –-output "tsv");...instead of...
local result=$(az <command> show <parameters>);…because the latter will throw an error if the target resource doesn’t exist, which of course it won’t the first time the deployment runs. Therefore, listing the instances by name with a query that forces one or zero results will instead harmlessly return an empty string in the create case, prompting the provisioning logic to execute (i and ii above).
I try to do as little work as possible in this “create case.” Ideally cloud infrastructure doesn’t change often once a project moves into the coding phases, but there are always tweaks along the way as an app incubates. Perhaps you’ll need to add more Key Vault secrets or tweak the permissions of an Entra ID app when requirements change. Therefore, I push as much logic into the “update case” as I can.
For Foundry, creating the Project resource under a Portal is an example of such a one time action that should only be performed when the parent instance doesn’t exist. There are many Azure configurations that can’t be changed downstream (such as bumping a Storage Account to premium or downgrading a Redis instance). In these extreme cases, it’s best to just manually delete the resource, modify the deployment logic, and rerun the infrastructure workflow.
(Note: having to delete components should be rare once your infrastructure is off the ground, and ideally won’t happen at all in production unless a major refactoring is necessary. Take care with components that need to purged after deletion [such as Foundry Portals] and/or ones that have enhanced retention policies [such as Key Vault].)
Then for #3, regardless of whether the provisioning logic happened, each function always performs its deterministic configurations of the target components, making sure to leverage Azure CLI commands that handle no-op updates gracefully. In other words, while the “create” case only happens once, the “update” case is always executed. For example, consider adding a managed identity to an Azure Container App. The first time you run something like this…
local containerAppIdentity=$(az containerapp identity assign --resource-group $resourceGroupName --name $containerAppName --system-assigned --query "principalId" --output "tsv");…the managed identity is created and the guid of the principal (for use in downstream RBAC configuration) is returned. Then as subsequent infrastructure workflows are executed, this line will be invoked over and over again, harmlessly returning the existing id. As with most az commands, this example call is "idempotent safe."
The point is that Infrastructure deployments entail more than just creating resources; the goal is to finish each GitHub action with a fully baked resource group ready to run your app. The “downstream” work I’ve been referring to includes configuring SSL and DNS for web sites, adding containers to Storage Accounts, connecting resources to Application Insights, implementing RBAC everywhere, etc. Every mouse click you would issue in the Azure portal is a line of code in your deployment script.
Finally, #4 entails running queries against the newly provisioned and/or configured resource to return the desired property values from it to the calling script. In my experience, this typically involves the following scenarios which the caller script dynamically leverages results to automate follow-on Azure configurations:
- Any property value that should be persisted to Key Vault (database connection strings, Entra app ids, API keys, etc. – this is especially useful for Entra app client secrets since they are only ever displayed once in the Portal; this mechanism ensures they are nestled away in Key Vault without ever been seen).
- Values that will be used in downstream configuration (API URLs for CORS rules, website URLs for Entra ID app callbacks, etc.).
- The id of components that need to be secured via RBAC. This is the “full Azure URL” of a PaaS resource in the form: /subscriptions/<subscription-id>/resourceGroups/<resource-group-name>/providers/<provider-name>/<component-type>/<component-name>,which is the “scope” of a future permission assignment. See the “ensure_rbac_access” section below for details.
- The guid principal id of a component’s managed identity, which is the “assignee” of a future permission assignment (also covered in “ensure_rbac_access”).
As your deployment matures (or infrastructure bugs are discovered), just keep adding and tweaking idempotent logic in the “update case” after ensuring the target component exists. Again, it will perform the configuration the first time the modified script runs against an existing resource group (or a new one when provisioning a higher environment), and then harmlessly no-op on all subsequent workflow executions.
Scripts
Okay! Now that I’ve covered all the salient architectural and philosophical points, let’s get into the code that is executed by the YML workflow. This section will detail the entirety of the “parent” script (foundry.sh) as well as the Foundry-specific bits (and the helper methods they depend upon) from the “child” utilities.sh.
Note: the full script files for the next two sections are hosted here.
foundry.sh
The first script is foundry.sh, which is called directly from the YML workflow with all GitHub inputs as parameters. Typically this script would be named something more general like “infrastructure.sh” and provision an entire resource group’s worth of components, but this blog post only focuses on the Foundry bits.
1#!/bin/bash
2#initialization
3environmentNormalized="${1,,}";
4resourceGroupName="$2";
5region="$3";
6appId="$4";
7#foundry settings
8foundrySKU="$5";
9foundryPortalName="$6";
10foundryProjectName="$7";
11#model deployment settings
12llmModel="$8";
13llmCapacity="$9";
14llmVersion="${10}";
15#apply naming conventions
16resourceGroupName="${resourceGroupName,,}-$environmentNormalized";
17foundryProjectName="$resourceGroupName-${foundryProjectName,,}01";
18foundryPortalName="$resourceGroupName-${foundryPortalName,,}01";
19#reference utilities
20source ./deployment/utilities.sh;
21echo "Starting Foundry $foundryPortalName infrastructure deployment.";
22#ensure foundry
23resourceGroupResult=$(ensure_resource_group "$resourceGroupName" "$region");
24foundryResult=$(ensure_foundry "$resourceGroupName" "$region" "$foundryPortalName" "$foundryProjectName" "$foundrySKU" "$appId");
25#ensure LLM model deployment
26llmModelResult=$(ensure_foundry_model_deployment "$resourceGroupName" "$foundryPortalName" "$llmModel" "$llmVersion" "$llmCapacity");
27#parse foundry components
28foundryComponents=(${foundryResult//|/ });
29foundryResourceId=${foundryComponents[4]};
30foundryAccountKey=${foundryComponents[0]};
31foundryOpenAIEndpoint=${foundryComponents[1]};
32foundryProjectEndpoint=${foundryComponents[3]};
33foundryInferenceEndpoint=${foundryComponents[5]};
34foundryDocumentIntelligenceEndpoint=${foundryComponents[2]};
35#SAMPLE NEXT STEP: grant azure ai search RBAC access to foundry
36#searchPrincipalId=$(az search service list --resource-group "$resourceGroupName" --query "[0].id" --output "tsv");
37#searchFoundryRBACCognitiveServicesUser=$(ensure_rbac_access "$searchPrincipalId" "$foundryResourceId" "Cognitive Services User");
38#SAMPLE NEXT STEP: ensure foundry key vault secrets
39#keyVaultName=$(az keyvault list --resource-group "$resourceGroupName" --query "[0].name" --output "tsv");
40#foundryAccountKeyResult=$(ensure_key_vault_secret "$keyVaultName" "foundry-account-key" "$foundryAccountKey");
41#foundryOpenAIEndpointResult=$(ensure_key_vault_secret "$keyVaultName" "foundry-open-ai-endpoint" "$foundryOpenAIEndpoint");
42#foundryProjectEndpointResult=$(ensure_key_vault_secret "$keyVaultName" "foundry-project-endpoint" "$foundryProjectEndpoint");
43#foundryInferenceEndpointResult=$(ensure_key_vault_secret "$keyVaultName" "foundry-inference-endpoint" "$foundryInferenceEndpoint");
44#foundryDocumentIntelligenceEndpointResult=$(ensure_key_vault_secret "$keyVaultName" "foundry-document-intelligence-endpoint" "$foundryDocumentIntelligenceEndpoint");
45#return
46echo "Completed Foundry $foundryPortalName infrastructure deployment.";
Let’s take this apart from top to bottom. The first 14 lines initialize the script by mapping the GitHub workflow inputs to Bash variables. Then lines 15-18 apply the Azure resource naming conventions. This is personal style of mine, ensuring all PaaS components are identified as [app prefix]-[environment]-[resource]01 with lowercase characters when allowed (the notable exception is Storage Accounts, which only support alphanumeric characters in their names).
The next stanza (lines 19-21) references utilities.sh, which, as previously mentioned, holds all my Bash Azure CLI functions to provision and configure PaaS components. This approach lets me reuse the core deployment logic in many projects, keeping the infrastructure’s SH and YML files specific to each simpler.
The main event plays out in lines 22-24 where the script calls utilities.sh and idempotently creates the resource group itself with a Foundry Portal and Project. The details will be elucidated in the next section. Then as soon as the Foundry Project exists, lines 25-26 deploy an LLM model to it.
The script ends with a few commented out stanzas that demonstrate how these results can be used to make your Azure infrastructure deployments 100% automated by parsing the results of utility functions (lines 35-42) and using those values downstream in the script in two examples.
First, lines 35-37 grant an Azure AI Search instance access to Foundry via managed identities and RBAC to allow custom skillsets to leverage it for AI-based document enrichments in its indices. Finally, the last block pumps Foundry values into Key Vault so that your application can consume them securely.
utilities.sh
Here is where the magic happens. I’ll describe the utility methods section by section tracing what’s called from foundry.yml via foundry.sh here so you have a good idea of what the code is doing and why. The entire file can be found in the link above if you want to dig into any of the other functions.
ensure_foundry (1 of 3)
Let’s wade into the shallow end of the pool and look at the skeleton of this method first; then we’ll dive deeper into the two omitted logic blocks (lines 21 and 31 below) separately.
1#Creates a microsoft foundry instance by name if it doesn't already exist. [Returns:accountKey|openAIEndpoint|documentIntelligenceEndpoint|projectEndpoint |inferenceEndpoint|resourceId]
2function ensure_foundry()
3{
4  #initialization
5  local sku=$5;
6  local name=$3;
7  local region=$2;
8  local project=$4;
9  local principalId=$6;
10  local resourceGroupName=$1;
11  local projectURL="/projects/$project";
12  local aiUserRoleId="53ca6127-db72-4b80-b1b0-d745d6d5456d";
13  local aiDeveloperRoleId="64702f94-c441-49e6-a78b-ef80e0188fee";
14  local contributorRoleId="b24988ac-6180-42a0-ab88-20f7382dd24c";
15  local cognitiveServicesUserRoleId="a97b65f3-24c7-4388-baec-2e87135dc908";
16  local cognitiveServicesContributorRoleId="25fbc0a9-bd7c-42a3-aa1a-3b75d497ee68";
17
18  #check existing
19  echo "Ensuring foundry $name." >&2;
20  local foundry=$(az cognitiveservices account list --resource-group $resourceGroupName --query "[?name == '$name']" --output "tsv");
21  if [ -z "$foundry" ]; then
22    . . .
23  else
24    #foundry already exists
25    echo "Foundry $name already exists." >&2;
26  fi
27
28  #assign foundry permissions to the given principal (if provided)
29  if [ -z "$principalId" ]; then
30    #no principal provided
31    echo "No principal id was provided to be granted foundry roles." >&2;
32  else
33    . . .
34  fi
35
36  #get foundry metadata
37  local projectAPI="api$projectURL";
38  local resourceId=$(az cognitiveservices account show --resource-group $resourceGroupName --name $name --query "id" --output "tsv");
39  local accountKey=$(az cognitiveservices account keys list --resource-group $resourceGroupName --name $name --query "key1" --output "tsv");
40  local projectEndpoint=$(az cognitiveservices account show --resource-group $resourceGroupName --name $name --query 'properties.endpoints."AI FoundryAPI"' --output "tsv");
41  local documentIntelligenceEndpoint=$(az cognitiveservices account show --resource-group $resourceGroupName --name $name --query "properties.endpoints.FormRecognizer" --output "tsv");
42  local openAIEndpoint=$(az cognitiveservices account show --resource-group $resourceGroupName --name $name --query 'properties.endpoints."OpenAILanguage Model Instance API"' --output "tsv");
43  local inferenceEndpoint="$(az cognitiveservices account show --resource-group $resourceGroupName --name $name --query 'properties.endpoints."Azure AIModel Inference API"' --output "tsv")models";
44
45  #return
46  projectEndpoint="$projectEndpoint$projectAPI";
47  echo "$accountKey|$openAIEndpoint|$documentIntelligenceEndpoint|$projectEndpoint$inferenceEndpoint|$resourceId";
48}
As I always do, the method starts off with initialization work on lines 1-16: mapping Bash parameters to variables and defining some Azure constants. These role ids are the ones typically needed to give AI developers the Foundry Portal access they need. In this case, they are assigned to an Entra app registration, allowing code to use it to integrate with the Foundry Project.
The idempotency check happens next on line 19, branching the logic based on whether the target instance exists. Back in the “Bash” section, I described its if statements as “very different;” line 20 is an example of where I’m coming from given my .NET background. The -z is basically an empty string conditional, and instead of curly braces, each if is terminated by an ending fi keyword (you’ll also find this in Bash’s version of switch statements with its case…esac blocks).
The omitted code on line 21 is actually the core inspiration for this blog post and will be discussed in the next section. But continuing on here, lines 26-32 moves us from the idempotent provisioning “one time create case” to the configuration “every time update case” and assigns the optional $principalId parameter permissions to the Foundry Portal instance. As mentioned above, this is an Entra app registration’s client id for my Foundry deployment scenario, but based on your infrastructure requirements, it could be any guid that represents a user, group, managed identity, etc. We’ll discuss Azure CLI RBAC in the final section to cover the code omitted on line 31.
Finally, line 33 completes the idempotent logic of the utility method by querying the desired return values from the Foundry resource that foundry.sh might need downstream for further dynamic resource group configuration. While there’s nothing bespoke here from an Azure CLI provisioning perspective, I do want to point out an example of Bash being more forgiving than PowerShell when it comes to string quote nesting and escaping. Let’s double click on line 37:
local projectEndpoint=$(az cognitiveservices account show --resource-group $resourceGroupName --name $name --query 'properties.endpoints."AI Foundry API"' --output "tsv");
In the bolded bit above, we see that the JSON returned by Azure CLI for Foundry Portals has spaces in some of the property names. While Bash is just fine with this string, PowerShell can’t handle it (see below). In fact, with Bash, I’ve never had to create intermediate JSON objects in code as PowerShell sometimes requires.

Finally, we curate the values to return as a pipe-delimited string and echo it to standard output in line 43 so the calling script can consume it. Again, I’m not sure if there is a better want to handle this given my at best junior varsity Bash skills. However, I give myself a break for deployment code; this type of string manipulation hack would never fly for me in an app…
ensure_foundry (2 of 3)
We’ve come to the main event! Before the big reveal, let me provide some background as to why the following code must tiptoe around Azure CLI shortcomings. In the new Foundry Portal experience, you can’t access agents without a Project. I think this is why, referring back to the last screen shot in the “PaaS Me Some Foundry” section, you are required to specify a default project name when creating an instance manually.
When I first started working on this automation, Foundry itself was very new. Azure CLI’s cognativeservices extension already supported the “AIServices” value of the --kind parameter, so I was always able to provision Foundry Portals in a deployment. However, when visiting them in the browser, I experienced some bizarre behavior without having done anything to create a Project. In this indeterminate state, when switching to the new Foundry experience, you are redirected and then prompted with the following dialog:

Selecting “Create a new project” from the dropdown above and clicking “Let’s go” would sometimes “work” (by creating a new Foundry Portal in addition to a Foundry Project in a new random resource group), sometimes spin the browser into an infinite redirect loop, and sometimes return the following error:

As Foundry’s preview matures, I am seeing less and less of the explicit error cases described above when experimenting to see if Azure CLI support for Foundry has improved, but regardless: having to manually create a project (whether or not the creation happens where I intend) violates the core tenant of an automated infrastructure deployment. The underlying issue is that there is a hidden Boolean property on a Foundry Portal instance called allowProjectManagement which used to default to false.
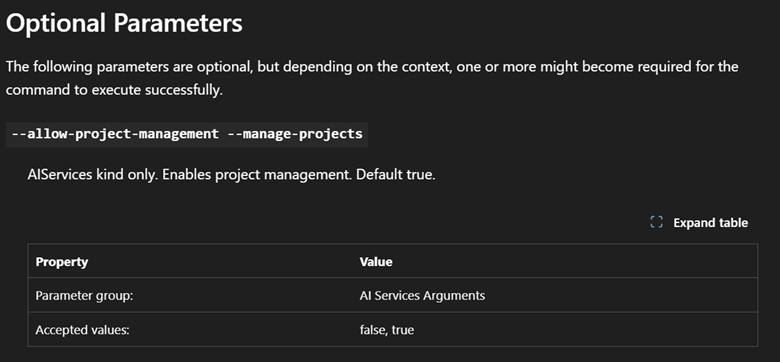
In later Azure CLI updates, I noticed that this parameter was added to az cognitiveservices account create and now defaults to true so I thought I was home free. It’s even called out nicely in the above-linked Microsoft documentation:
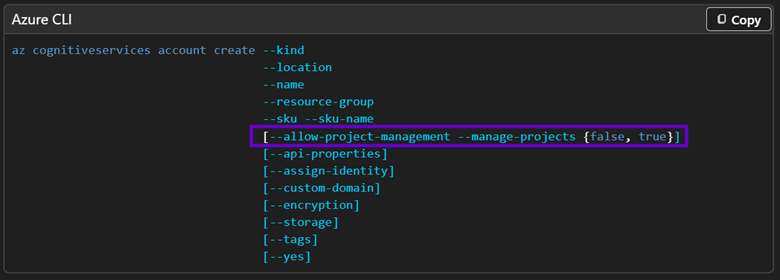
But it’s a lie! (Not really - see the update section at the top of this post.)
PS C:\Users\ChrisDomino> az cognitiveservices account create --resource-group $resourceGroupName --name $name --location $region --custom-domain $name --kind "AIServices" --sku $sku --query "id" --output "tsv" --allow-project-management --assign-identity --yes
unrecognized arguments:--allow-project-management
PS C:\Users\ChrisDomino> az cognitiveservices account create --resource-group $resourceGroupName --name $name --location $region --custom-domain $name --kind "AIServices" --sku $sku --query "id" --output "tsv" --manage-projects --assign-identity --yes
unrecognized arguments:--manage-projects
PS C:\Users\ChrisDomino> az cognitiveservices account create --resource-group $resourceGroupName --name $name --location $region --custom-domain $name --kind "AIServices" --sku $sku --query "id" --output "tsv" --allow-project-management $true --assign-identity --yes
unrecognized arguments:--allow-project-management True
PS C:\Users\ChrisDomino> az cognitiveservices account create --resource-group $resourceGroupName --name $name --location $region --custom-domain $name --kind "AIServices" --sku $sku --query "id" --output "tsv" --allow-project-management "true" --assign-identity --yes
unrecognized arguments:--allow-project-management true
As you can see, I tried really hard to set this property conventionally, but no love; without a different approach, my deployed Foundry Portals would remain barren. I made what turned out to be a good assumption that this property had to exist, and the issue was simply around Azure CLI not exposing it properly verses Foundry refusing to accept it.
The workaround is to leverage the Azure Management REST API to set this property on an existing Foundry Portal instance directly. Similar to using reflection in .NET to sneak into private members, the Bash script has to leverage this API via the az rest command to force-enable project creation. Without further ado, here’s the code:
1#create foundry portal normally
2echo "Creating foundry $name." >&2;
3local foundryId=$(az cognitiveservices account create --resource-group $resourceGroupName --name $name --location $region--custom-domain $name --kind "AIServices" --sku $sku --query"id" --output "tsv" --assign-identity --yes);
4#build management API URL
5local queryString="?api-version=2025-06-01";
6local contentType="Content-Type=application/json";
7local managmentURL="https://management.azure.com$foundryId";
8#update foundry to allow project creation (not currently supported by azure cli)
9echo "Enabling foundry $foundryId project creation."  >&2;
10foundry=$(az rest --method PATCH --uri "$managmentURL$queryString" --headers $contentType --body "{'properties': {'allowProjectManagement': true}}");
11#wait for update to finish (check every 10 seconds for up to 1 minute)
12local projectResult=$(wait_for_az_rest_command "$foundryId" "10" "60");
13if [ "$projectResult" != "0" ];then
14echo "Foundry $foundryId project enablement failed." >&2;
15exit;
16fi
17#create a default project with a managed identity
18echo "Foundry updated successfully. Creating default project." >&2;
19local project=$(az rest --method PUT --uri "$managmentURL$projectURL$queryString" --headers $contentType --body "{'location': '$region', 'properties': {'description': 'This project holds your $project agents.', 'displayName': '$project'}, 'identity': {'type':'SystemAssigned'}}");
20echo "Default foundry project $project created in foundry portal $name successfully." >&2;
The first stanza (lines 1-3) creates a Foundry Portal using Azure CLI as advertised. Line 3 does something cute where I return a single property from the creation call itself. This works because “create” commands return the entire JSON representation of the newly-minted resource; --query lets me grab the id needed to build out the REST endpoint.
Next, we cobble together the rest of the Azure Management API PATCH URL reqired to set the property on the new instance that allows Foundry Project management in lines 4-10. Note that this doesn’t use curl; leveraging the az rest CLI command instead handles authentication for us automatically.
I guess that’s a nice consolation prize for having to do all this extra work in the first place. However, when going “behind CLI’s back” in this manner, we lose the --wait parameter found on many standard commands. Therefore, I wrote a Bash helper function to do this; see the “wait_for_az_rest_command” section below. This is required because the rest API call is asynchronous; the final stanza that creates the Project itself would otherwise fail if this property isn’t set on the parent Portal first.
Finally, we see that these last few lines (17-20) also need to invoke az rest (as a PUT this time) to create the actual Foundry Project; I haven’t found a dedicated Azure CLI command that supports this as a proper extension. Thankfully, reverse engineering the JSON for this wasn’t too painful since Projects inherit most of their behaviors from their Portals and therefore only basic properties are required.
This is of course a dangerous road to wander down; any changes Microsoft makes to Foundry Project’s PaaS schema could break this workaround. Layering in the fact that the new Foundry experience is still in preview exacerbates this risk. Fortunately, I only had to set very common Azure properties as mentioned above (name, description, region, and a system-assigned managed identity) so this should be safe for now. As soon as Foundry Projects are better supported with conventional Azure CLI commands proper, this code should be refactored to leverage those instead.
ensure_foundry (3 of 3)
Let’s finish off ensure_foundry before looking at the supporting helper methods; we still have to fill in the code on line 31 from the initial utilities.sh listing. As I mentioned previously, there’s not much for AI Foundry engineers to do in Azure itself beyond managing Foundry IAM best practices, so this block performs the idempotent security updates that run on every workflow invocation, allowing you to tweak your deployment logic as your project nears production readiness and your security model comes into focus.
1#get foundry's scope (id)
2echo "Granting principal $principalId foundry roles." >&2;
3local scope=$(az cognitiveservices account show--resource-group $resourceGroupName --name $name --query "id"--output "tsv");
4#add the principal to the roles
5$(ensure_rbac_access "$principalId" "$scope" "$aiUserRoleId");
6$(ensure_rbac_access "$principalId" "$scope" "$contributorRoleId");
7$(ensure_rbac_access "$principalId" "$scope" "$aiDeveloperRoleId");
8$(ensure_rbac_access "$principalId" "$scope" "$cognitiveServicesUserRoleId");
9$(ensure_rbac_access "$principalId" "$scope" "$cognitiveServicesContributorRoleId");
10echo "Granted principal $principalId foundry roles successfully." >&2;
wait_for_az_rest_command
Azure resources have a base property called provisioningState that is set to “Succeeded” when they are created without error.

However, you can also access this property using az resource instead so that custom helper methods (such as this one) can be used generically against anything; you just need to supply the id of the PaaS resource:

When manipulating a resource via az rest, the Azure Resource Manager will keep updating the value of this property on the component to one of these states as the cloud gears turn behind the scenes; all we have to do to handle these asynchronous calls in series is poll this property until we can ascertain a final success or failure result. Here’s the code:
1# Polls the given resource's provisioning status.
2# [Returns: 0 (Succeeded) or 1 (Failed)]
3function wait_for_az_rest_command()
4{
5  # initialization
6  local resourceId=$1;
7  local maxSeconds=$3;
8  local totalSeconds="0";
9  local provisioningState="";
10  local pollingIntervalSeconds=$2;
11
12  # wait for success
13  while [ "$provisioningState" != "Succeeded" ]; do
14    # pause
15    sleep $pollingIntervalSeconds;
16    totalSeconds=$((totalSeconds + pollingIntervalSeconds));
17
18    # poll
19    provisioningState=$(az resource show --id "$resourceId" --query "properties.provisioningState" --output "tsv");
20    echo "Current provisioning status for $resourceId after $totalSeconds seconds: $provisioningState." >&2;
21
22    # check result
23    if [ "$provisioningState" == "Failed" ] || [ "$totalSeconds" -ge "$maxSeconds" ]; then
24      echo "Provisioning $resourceId failed after $totalSeconds seconds." >&2;
25      echo "1";
26      return 1;
27    fi
28  done
29
30  # return
31  echo "Provisioning $resourceId succeeded after $totalSeconds seconds." >&2;
32  echo "0";
33}
This is probably the most “logic heavy” of any method in utilities.sh, featuring such exotic code as a Bash while loop and arithmetic: a departure from otherwise basic Azure CLI wrapper bits. But the idea is simple: every few seconds, line 16 checks the target resource’s provisioningState and then 19 determines failure by either getting a result of “Failed” or detecting that a certain amount of time has passed. Both the pause duration (lines 9 and 14) and total duration (lines 6 and 19) are configurable as parameters (in seconds).
Remember that in utility methods, we log information messages to error output via >&2, but return the actual result by “directly” echoing “1” (line 21) for failure or “0” (line 28) for success, following Bash parlance. In summary, az rest commands paired with az resource polling handles asynchronous, long-running Azure CLI operations cleanly in code without any time travel.
ensure_rbac_access
For completeness, I also wanted to cover what the RBAC code is doing, so let’s take a look at this simple helper method:
1# Grants a service principal access to an Azure source under the given role. [Returns nothing]
2function ensure_rbac_access()
3{
4  #initialization
5  local roleName=$3;
6  local resourceId=$2;
7  local principalId=$1;
8  #return
9  local role=$(az role assignment create --assignee "$principalId" --scope "$resourceId" --role "$roleName");
10  echo "Granted $roleName access for $principalId to $resourceId successfully." >&2;
11}
As you can see, it’s just a wrapper around az role assignment create. Ostensibly, line 9 assigns a role to the given principal against a particular Azure PaaS resource. As previously mentioned, the “scope” here is not the same concept as exposing an API on an Entra ID app registration; it’s the full “Azure URL” identifier (the “id” property) of the target component being secured. The role can be the guid or name of a well-known Azure permission (either a “generic/global” one like “Contributor” or a resource-specific one like Foundry’s “Azure AI Developer”).
One quick gotcha is that for Entra apps, their service principal ids – the physical representation of the credentials and permissions they encapsulate – are not the app/client ids used for OAuth identification. This was probably my biggest stumbling block learning Entra backwards from a developer’s perspective: RBAC happens against each app registration’s Enterprise application object instead.
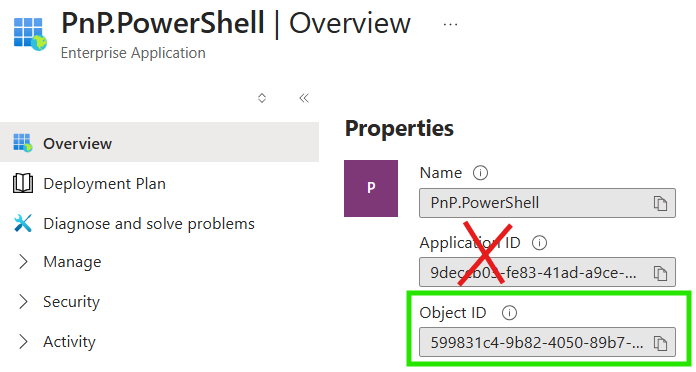
Basically, the app registration is the app itself, where engineers configure permissions, APIs, authentication, etc. The corresponding Enterprise application is the service principle, similar to a PaaS managed identity. Let’s take a look at my old friend, PnP PowerShell, as an example. Here’s the app registration…
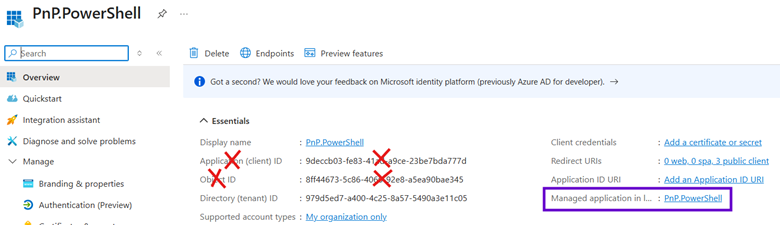
…and here’s the enterprise app after clicking the link in the purple box above, revealing the correct guid to use when assigning the app to RBAC roles in the green box below:
Provisioning Entra ID apps via Azure CLI is outside the scope of this blog post, but all the bits are in the linked utilities.sh file above. Check out get_app_registration_enterprise_object_id and get_user_object_id for examples on how to get the proper “assignee” principal ids for apps and users respectively to feed to RBAC. Again, automated deployments combine provisioning and configuration to achieve fully touchless, repeatable, idempotent Azure cloud infrastructures.
Conclusion
And there we have it! The AI layer of our modern cloud apps is provisioned automatically along with the rest of the infrastructure and integrated seamlessly into the architecture. Microsoft Foundry has proven that modern AI development doesn’t have to change the game for .NET engineers or anyone operating in the Microsoft ecosystem.
By automating the deployment of these infrastructures, we can ensure that as development resource groups take shape, all of their configurations can be dynamically built out in a repeatable manner. GitHub workflows hosting Bash scripts are the vehicles that drive our Azure solutions to the promised land of reliable idempotent production releases so that our robots can see the light of day.
.svg)