

Series Overview
Welcome to the first deep dive of the series! The architecture I’m presenting as “The Hard Way” to teach Microsoft Foundry agents about SharePoint content was introduced in the previous post, so make sure to reach that plateau before starting this next climb. We won’t touch upon anything specific to Foundry or AI here, but hopefully it will provide some useful “Human Intelligence” around working with Power Platform and SharePoint from a low code perspective. Use the table of contents below in case you want to explore other posts in this series.
- Tradeoffs Between the Two Approaches
- SharePoint Knowledge Connections to Foundry Agents the Easy Way
- SharePoint Knowledge Connections to Foundry Agents the Hard Way
- Deep Dive 1: Extraction
- Deep Dive 2: Ingestion
- Deep Dive 3: Vectorization
- Azure AI Search Knowledge Connections to Foundry Agents
Extracting SharePoint Content with Power Automate
The Power Platform is Microsoft’s “no/low code” tech stack for civilians to create custom systems on a non-enterprise scale. While it umbrellas many cool tools, the three that tend to come up in larger architectures are Power BI (data layer), Power Automate (backend), and Power Apps (frontend). Here we’ll focus on Power Automate flows as the first component of the architecture’s middleware. All references to the custom C# API will be covered in the next post of this series.
Let’s climb!
The Best Event Receiver Flavor
Back when SharePoint was all on premises, we had a technology called event receivers which, like SQL triggers, are handlers that fire when something changes on the data layer, such as a new document being uploaded or a list item getting deleted. While these are useful for certain complex auditing or validation scenarios, I’ve never been a fan.
The problem is that they put logic in the data layer, which violates the architectural principle of separation of concerns. This makes trigger-like functionality hard to monitor and even harder to debug. As SharePoint has moved into M365, this approach evolved into remote event receivers and now even supports proper webhooks. However, these still feel like a rickety mountain rope bridge with rotting planks connecting the towering peaks of the backend and middleware of a SharePoint architecture.
Power Automate solves many of these black box problems by providing a UI that shows every execution of your flow with detailed telemetry around execution time, errors, and even the ability to debug previously failed runs; you can literally watch these erred workflows repropagate in real time. And by organizing your flows into Power Platform solutions, we can leverage environment variables, source control, and deployment pipelines, elevating this technology to a proper enterprise architectural component.
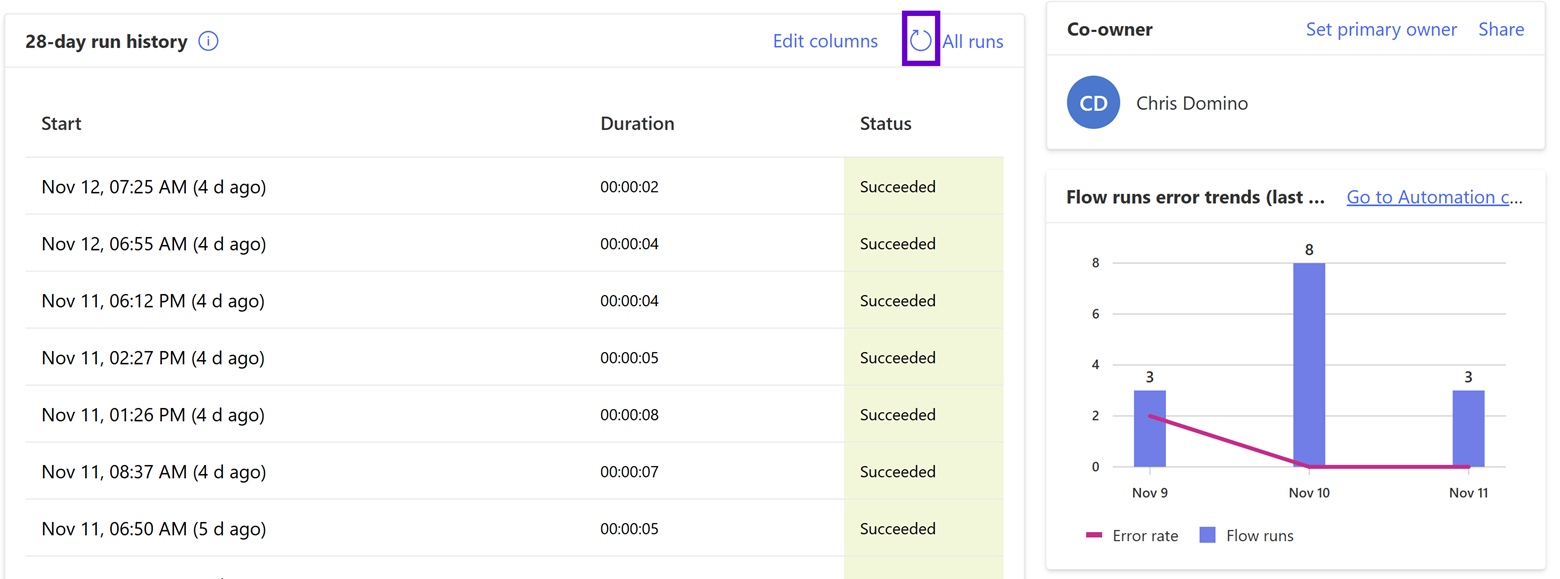
What I love about using Power Automate against SharePoint is that, as mentioned in the previous post, your data layer is blind to the integration (as it should be). Flows with triggers that fire based on SharePoint activity still have a bit of a “rickety mountain bridge” feel since they work by polling your information architecture (IA) instead of being explicitly called; there is still an anxiety I feel frantically refreshing the above screen waiting for my new flow to, well, flow for the first time.
However, the upside for me is that Power Automate establishes itself as its own middleware tier in the architecture instead of being an awkward appendage of the data layer. Flows are therefore my preferred approach as the “least rickey” way to react to SharePoint changes automatically. Let’s take a look at the three flows used to cross crevasses blocking our trek up AI mountain.
Token Acquisition
As previously mentioned, I recommend always starting your Power Platform work using a solution, even if you are just doodling a quick personal automation to send email attachments to OneDrive or analyze a Power BI conceptual model. If nothing else, as previously mentioned, it is great for component organization and provides environment variables to avoid hardcoding SharePoint URLs, document library names, API keys, and other secrets.
An additional capability of solutions is the ability to execute other Power Automate actions as “child flows” providing a nice scale point. Since the two more “functional” flows below will connect SharePoint actions to our API, both will need an access token to communicate with the endpoints. (Review the previous post for information around the Entra ID side of things in this architecture.) The ability to build this once and reuse it across the solution is another example of Power Automate flexing its architectural muscles. (I also leverage this flow for yet another purpose; see the “A Little Swagger” section in the next post.)
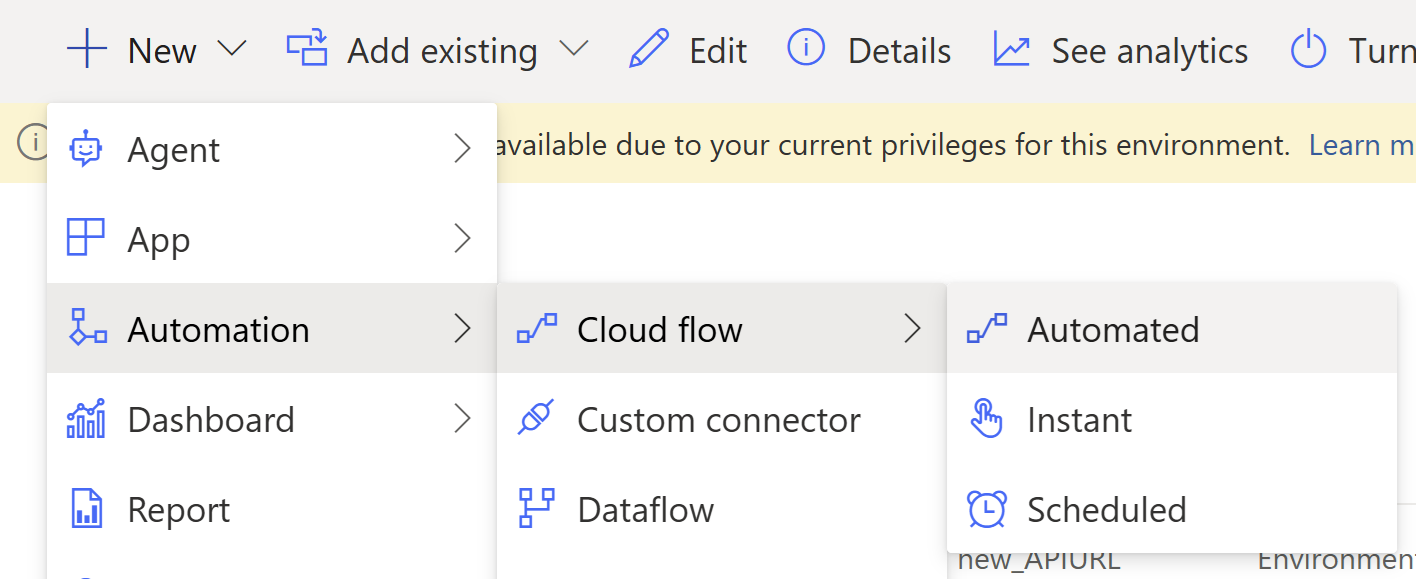
A detailed explanation of the Power Automate editor is outside the scope of this post, but I will provide the details of each step and activity so you can follow along like a mountaineering expedition tethered together in the blinding snow. First, create a new “Instant Cloud Flow” in your solution as follows:

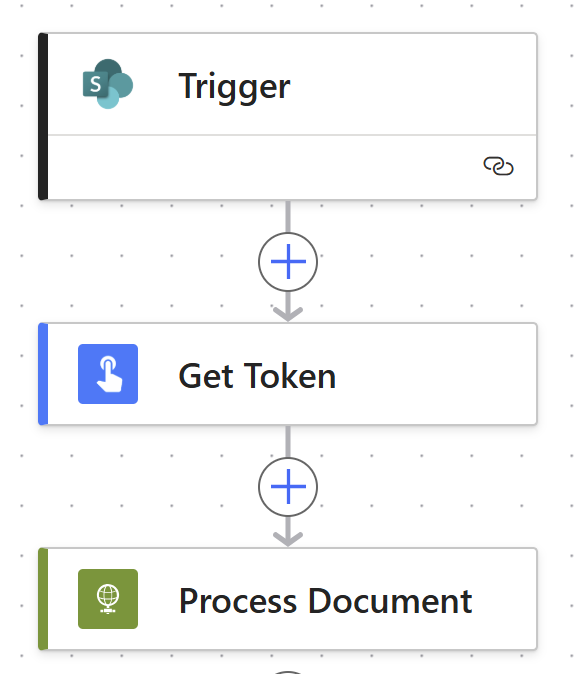
Here is the high-level token acquisition workflow:
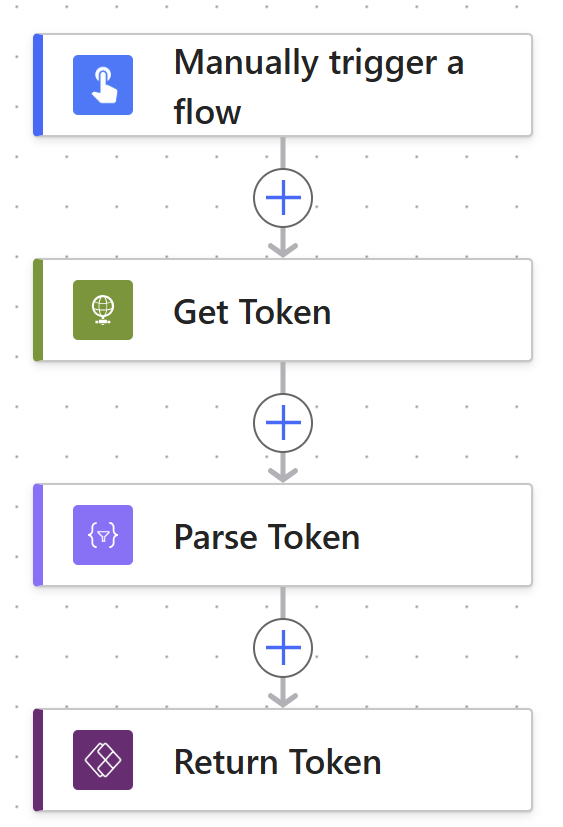
This trigger has no inputs, so let’s start with “Get Token.” This uses the vanilla “HTTP” activity, which is unfortunately a paywalled connector requiring a premium license for the flow owner. I typically try to avoid the shiny diamond icons around the Power Automate interfaces that designate paid functionality so that we can climb the mountain without having to mine into it for jewels. That said, this is by far the easiest way to leverage our Entra ID app registration in a low code environment, so it’s well worth it in my opinion. Here are the details:

- URI: This is the absolute URL to your organization’s OAuth token endpoint; you can snag your tenant’s guid from the Azure portal’s Entra ID home page and stash it in an environment variable.
- Method & Headers: Configure a boilerplate POST to this endpoint with the body advertised to be formatted as a query string via a “Content-Type” header with “application/x-www-form-urlencoded” as its value.
- Body: Create two other environment variables in your solution that hold the client (app) id and secret from your app registration (and remember that Entra ID only exposes the client secret once upon creation, so copy and paste it hard). Then use them here to build out your token request against the scope opened for this specific integration. Make sure to include “/.default” at the end; this fragment isn’t part of the scope definition defined in the app registration.
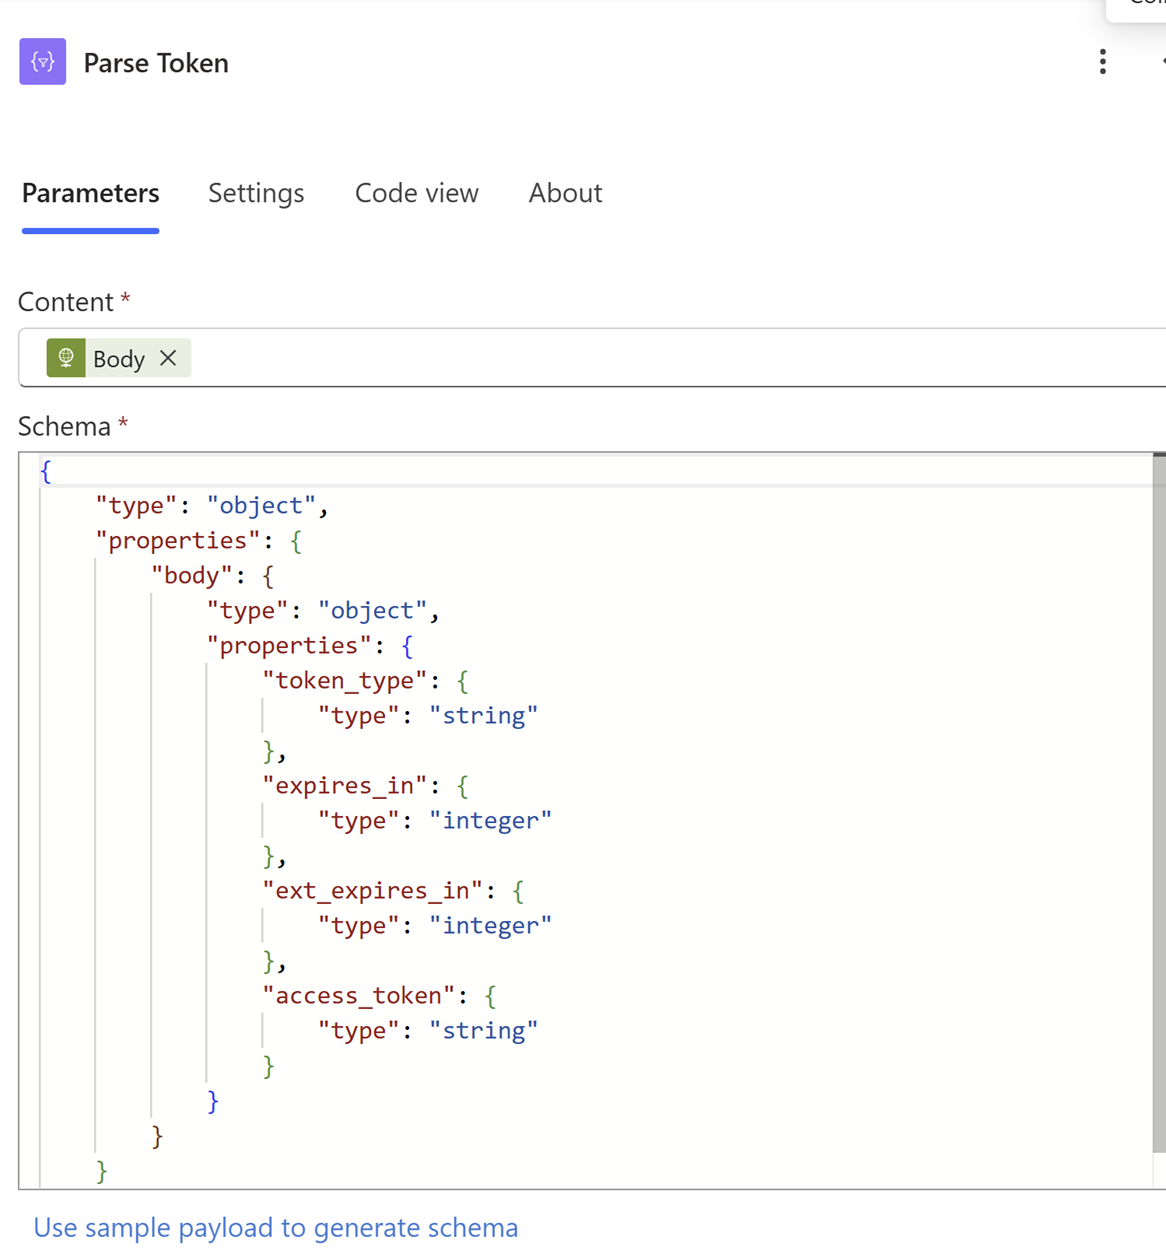
Here is the JSON schema so you can copy and paste it.
{
"type": "object",
"properties": {
"body": {
"type":"object",
"properties": {
"token_type": {
"type": "string"
},
"expires_in": {
"type": "integer"
},
"ext_expires_in": {
"type": "integer"
},
"access_token": {
"type": "string"
}
}
}
}
}
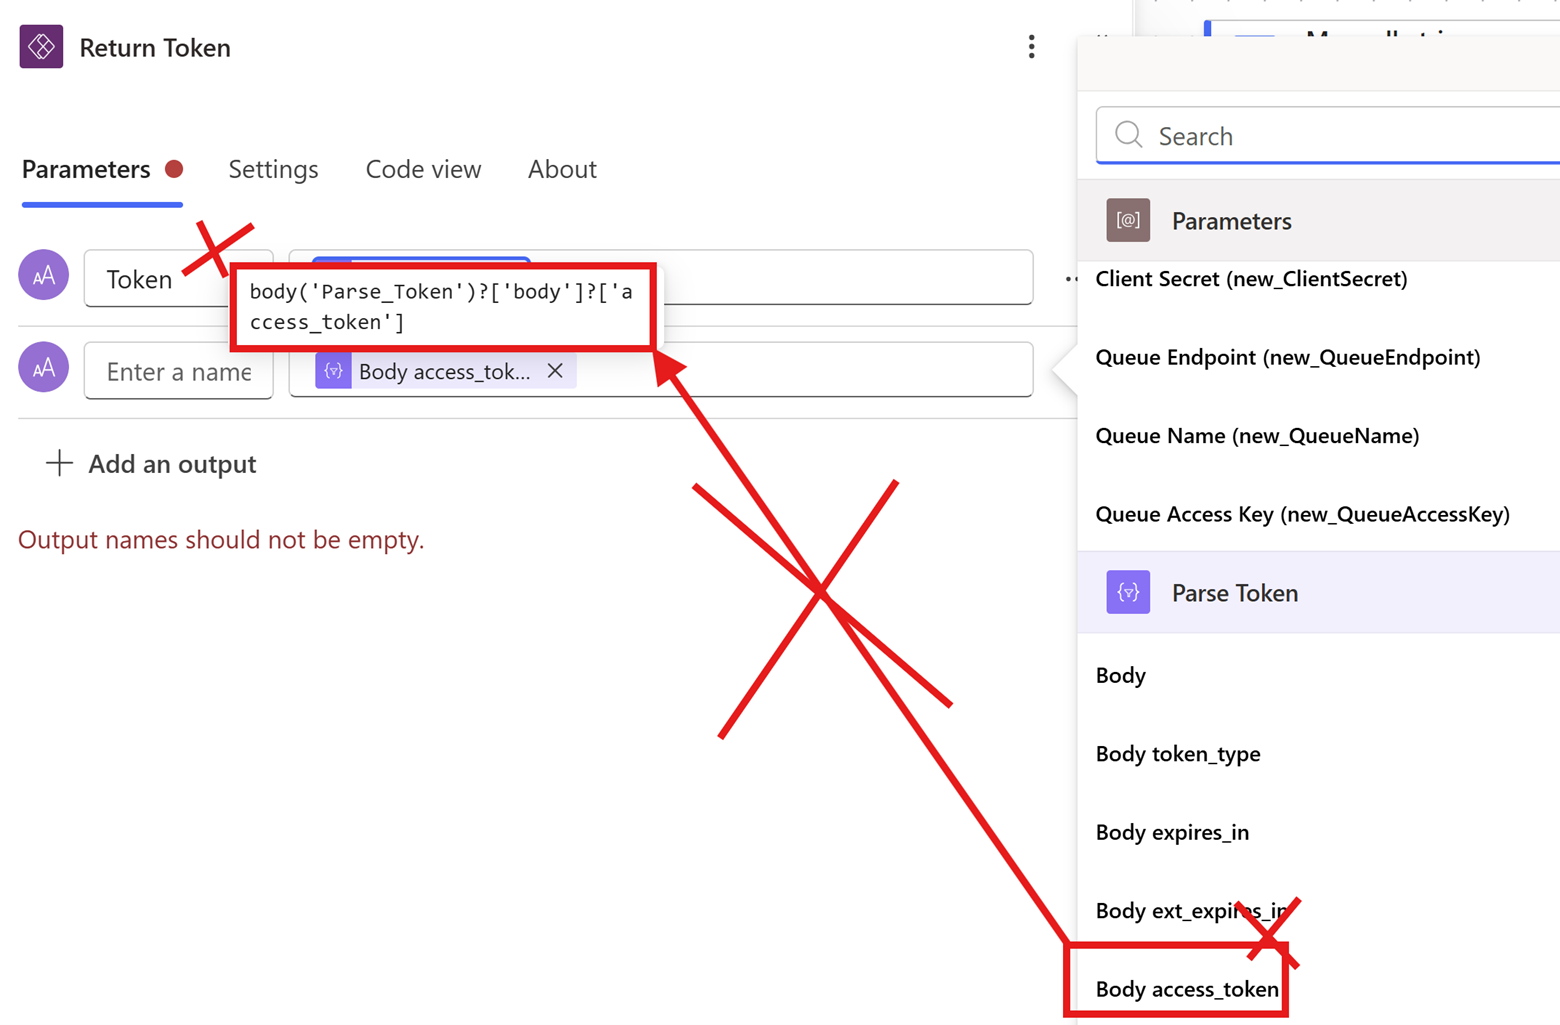
Finally, we isolate the access token and configure it as the output parameter in the “Return Token” activity using the following expression:
body('Parse_Token')?['access_token']
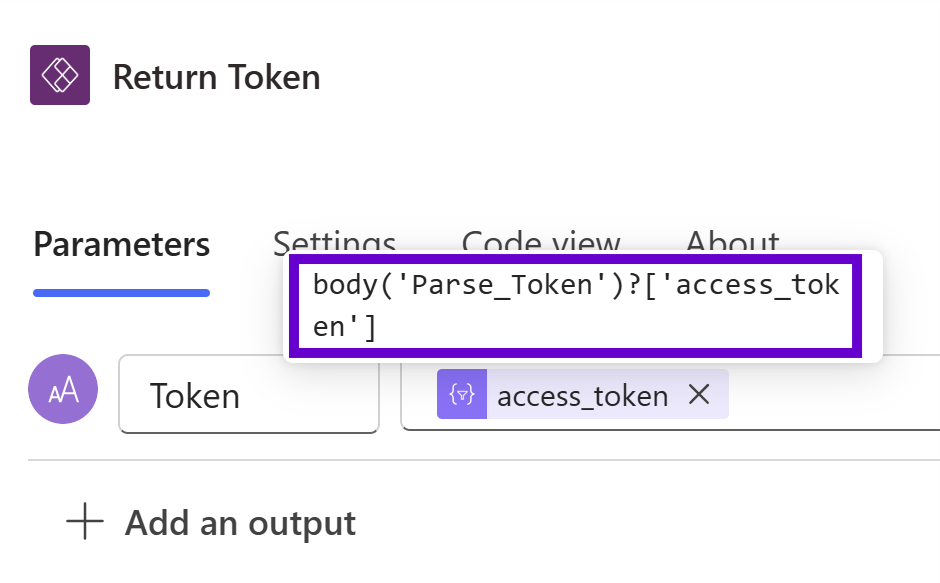
Important note: I code this in manually above since the output variables from the “Parse JSON” activity do not deconstruct the JSON property hierarchy the way we need it to in this case. If you try to use the “Body access_token” Power Automate default output variable, it will “double check” the body and fail at runtime. The screenshot below is WRONG!
Foundry Ingestion
With authentication sorted, let’s call our endpoints! The separation of the SharePoint integration into two flows is based on the available Power Automate triggers. This first one can handle both the creation of and changes made to SharePoint documents (via editing an existing file or replacing it by uploading a new one with the same name). Let’s start by creating a new automated cloud flow:
In the modal that pops up, give your flow a name (I’m using “Foundry Ingestion”) and type “SharePoint” into the “Choose your flow’s trigger” field. There are a lot of options to choose from, but go with “When a file is created or modified (properties only)” as follows:

Several Power Automate SharePoint triggers have a hard-to-see “(properties only)” qualifier, which only return metadata about the data against which they are operating. One strong recommendation I have is to keep your flows as simple as possible. Complex workflows can lag (and potentially crash) the browser-based editor, and large file payloads slow down execution. Given my foresaid preference to push as much functionality to the backend C# as possible, there’s no need to download the entire file at this stage of our ascent up the mountain.
Let’s get into the Foundry Ingestion flow:
I hope this isn’t too underwhelming after all the backstory! The trigger simply tells the flow where in SharePoint to poll using two more Power Platform solution environment variables containing the absolute URL to the SharePoint site collection and the display name of the target document library.
Public Service Announcement
I need to interrupt myself with here with a no-so-quick pro tip to hopefully save you from a deployment avalanche. In a Power Automate solution designed to be promoted to higher Power Platform environments and/or reused across multiple sites, never select the list or library from the dropdown menu under the “Site Address” field of any SharePoint activity. Once the editor creates its connection to M365 after you enter the site URL value, it will spin and talk to SharePoint, and then dynamically populate the “Library Name” field with a picklist.
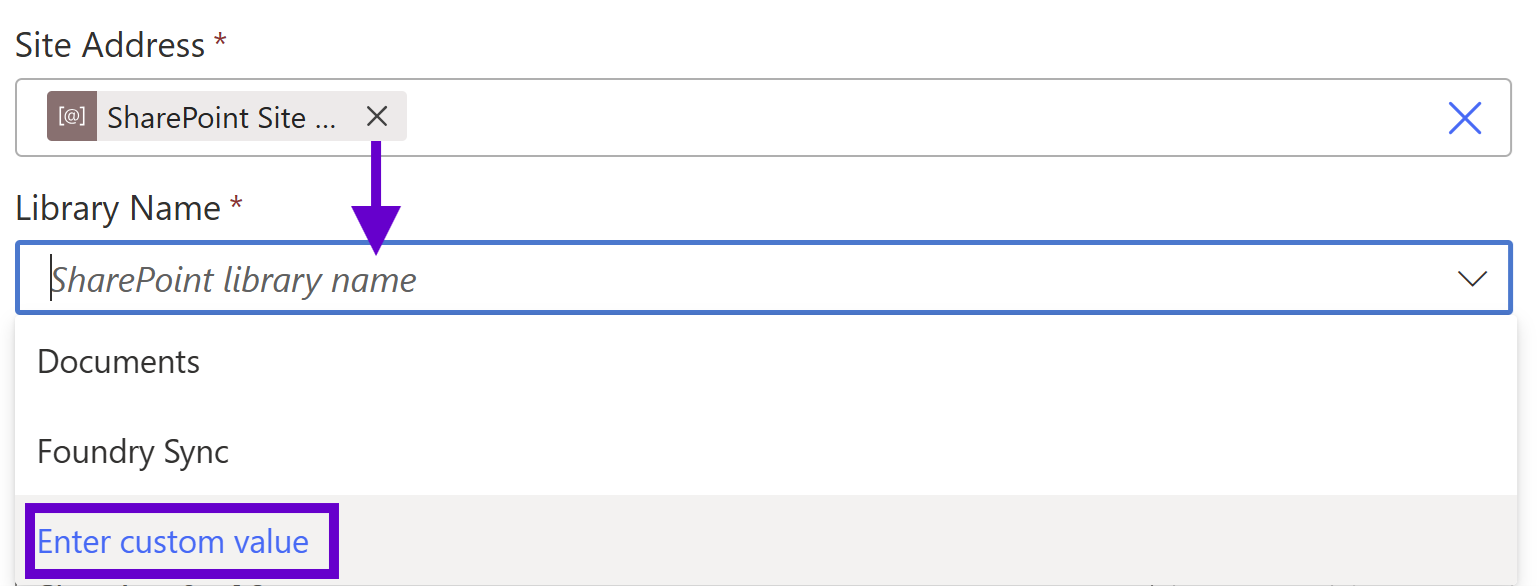
This is of course nice functionality for civilians, but it’s a trap for developers! If you select one of your list/libraries from it, the flow will store the corresponding object’s guid in the metadata, which will break when executed against a different site collection. The statement I’m about to write will require years of therapy to undo the ensuing cognitive dissonance, but here we go: use a string instead of a unique identifier in these scenarios. Cringe emoji!
Leveraging a Power Platform environment variable makes this pill easier for me to swallow, but let me explain why this apparent hard coding is important. I always always always script all my information architecture (IA) when provisioning a new SharePoint site so that I can control (and therefore reference in C# with well-known constants) content type ids, internal field names, taxonomy guids, etc. The one unique identifier SharePoint APIs have never allowed developers to curate is list ids; the best we can do is specify the display name.
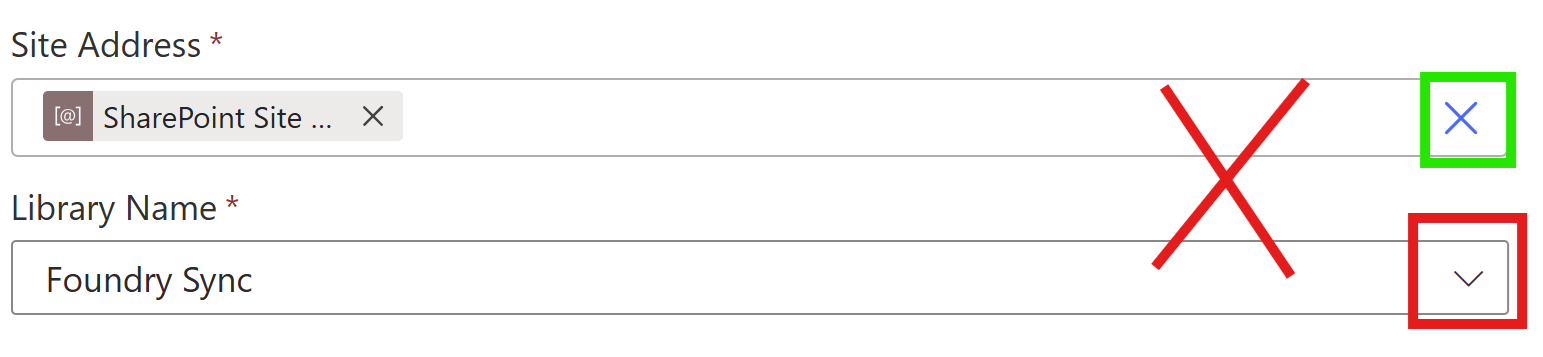
So in the screenshot above, click “Enter custom value” and throw in the corresponding environment variable instead. Assuming you have also scripted your IA and thus have consistent display names across environments, you can ensure your deployed Power Platform solutions always target the correct lists and libraries. When preparing for flow deployments, I always review all SharePoint activities and look for “two X’s” instead of “an X and a V” as a sort of visual unit test.
Good:

Bad:
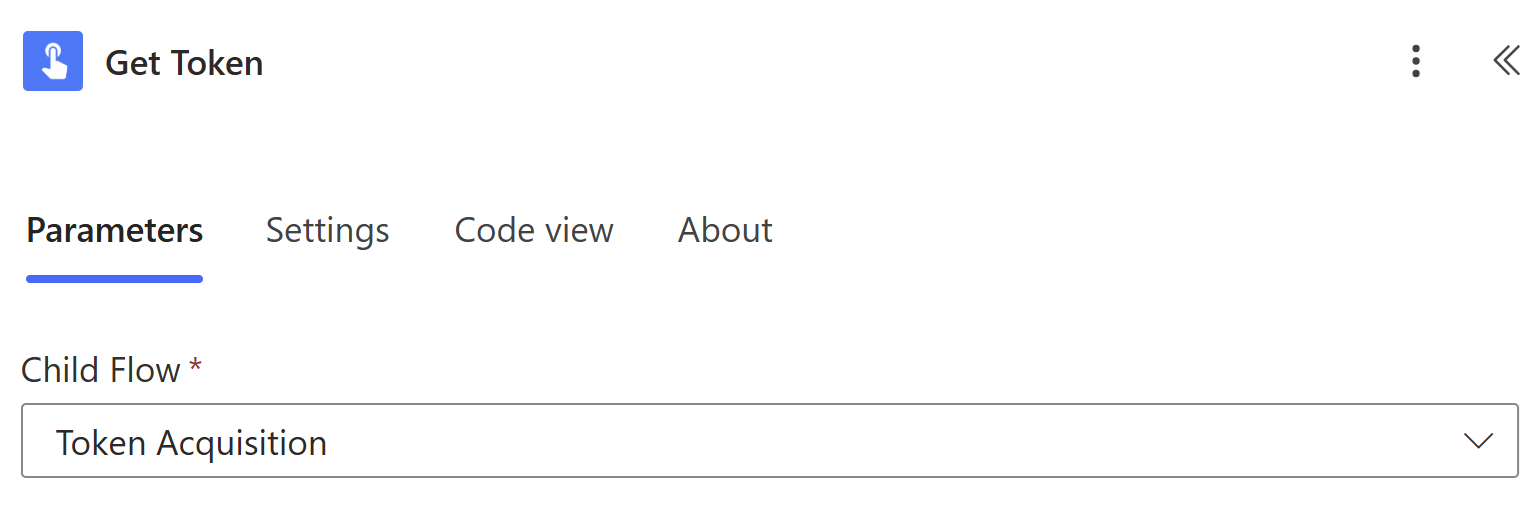
Back to work! Next, we call the “Token Acquisition” child flow to get our authentication token:
Finally, we send file metadata from the trigger to our API using another “HTTP” premium connector. Fortunately, once a flow uses a single shiny diamond, you might as well luxuriate in advanced functionality; Microsoft doesn’t charge per activity, so feel free to submerge yourself in the hot tub after wading in once. Here’s an example of these icons so you can assess which flows require premium licenses:
The third activity calls our custom endpoint:
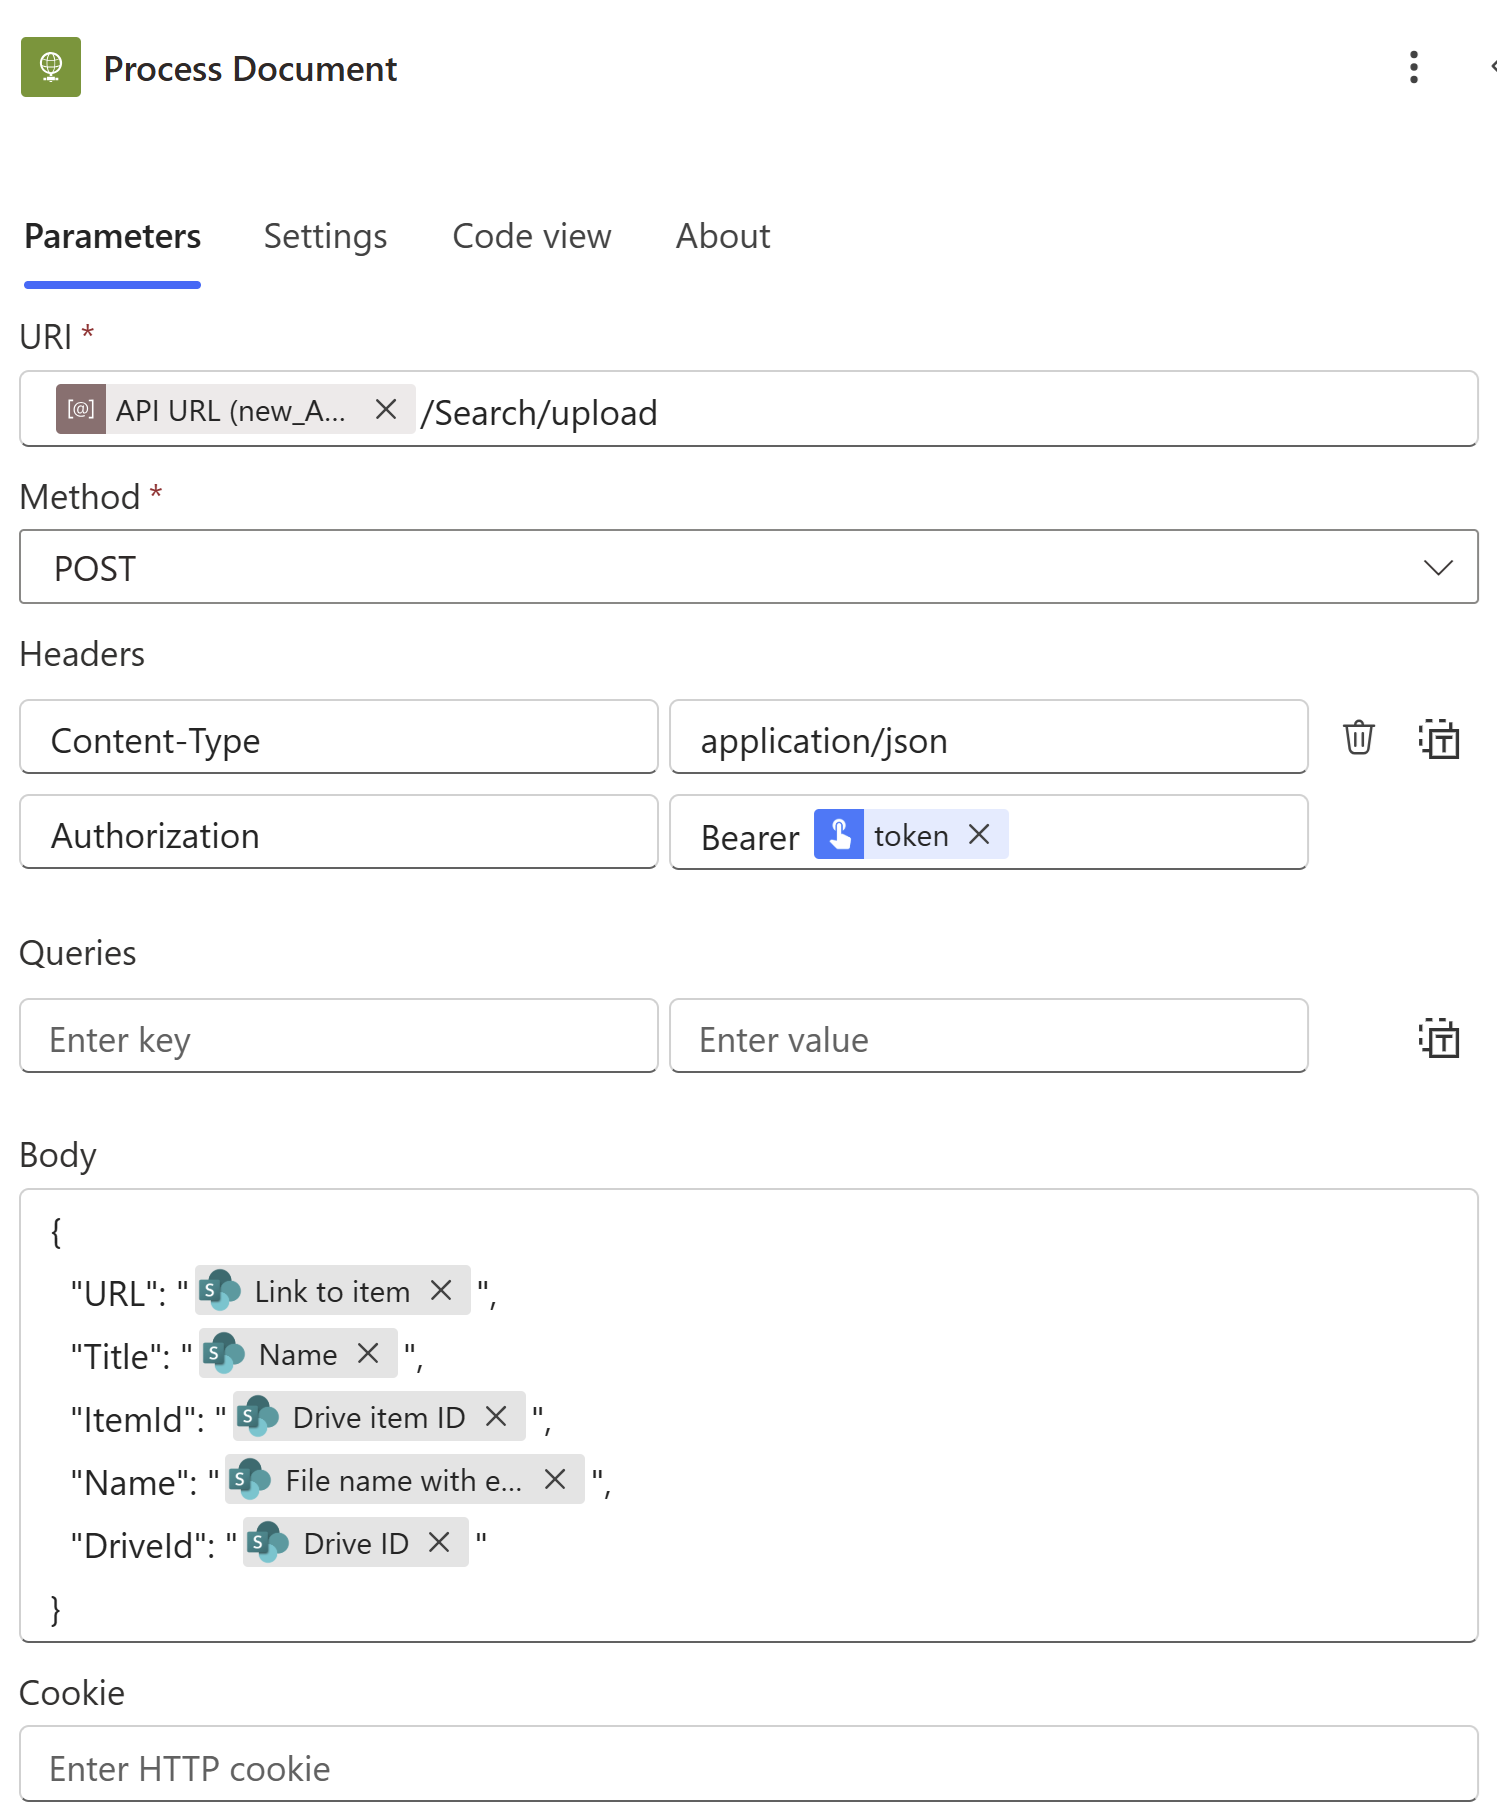
- URI: This is the absolute URL to the ingestion endpoint of our API. As with the target SharePoint site collection, use an environment variable to capture the domain corresponding to the hosting web app (assuming you have a 1:1 between Azure resource groups and Power Platform environments) and then specify the rest of the path.
- Method & Headers: Configure a boilerplate POST to the REST endpoint using a “Content-Type” header of “application/json” and authenticate with the JWT Bearer token acquired from the output of the child flow above (with a space before "token").
- Body: Create the JSON payload from the output properties of the trigger activity. As you can see, we’re going to use Microsoft Graph’s OneDrive identifiers instead of SharePoint metadata to avoid an extra dependency on PnP NuGet packages in the API and thus simply our C# code.
- We still bring the file’s SharePoint URL along for the ride as that will be needed due to some limitations of the deletion flow we’ll be looking at next.
- If you’re using a custom content type, feel free to include any other properties useful to your Foundry implementation.
- Note that the full name of the penultimate property is “File name with extension” – this will be the same case in the next flow.
Foundry Deletion
The final flow supports removing Foundry context when files are deleted in SharePoint. While this is important to ensure your agents don’t reason over stale data, it is not strictly required for any technical reasons. Create this flow with the SharePoint “When a file is deleted” trigger. As with the previous two sections, let’s take a bird’s eye look first:
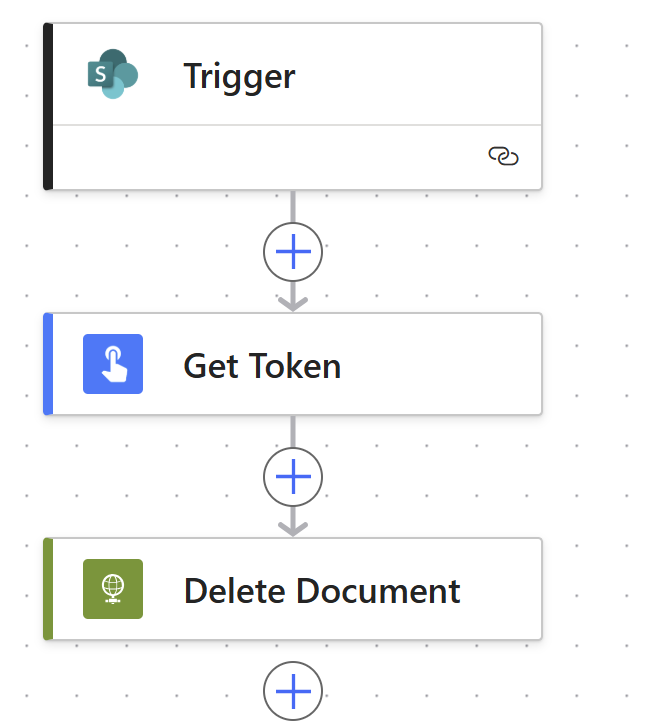
The “Trigger” and “Get Token” activities’ configurations are identical to “Foundry Ingestion” above, so let’s skip straight to the “Delete Document” bit:
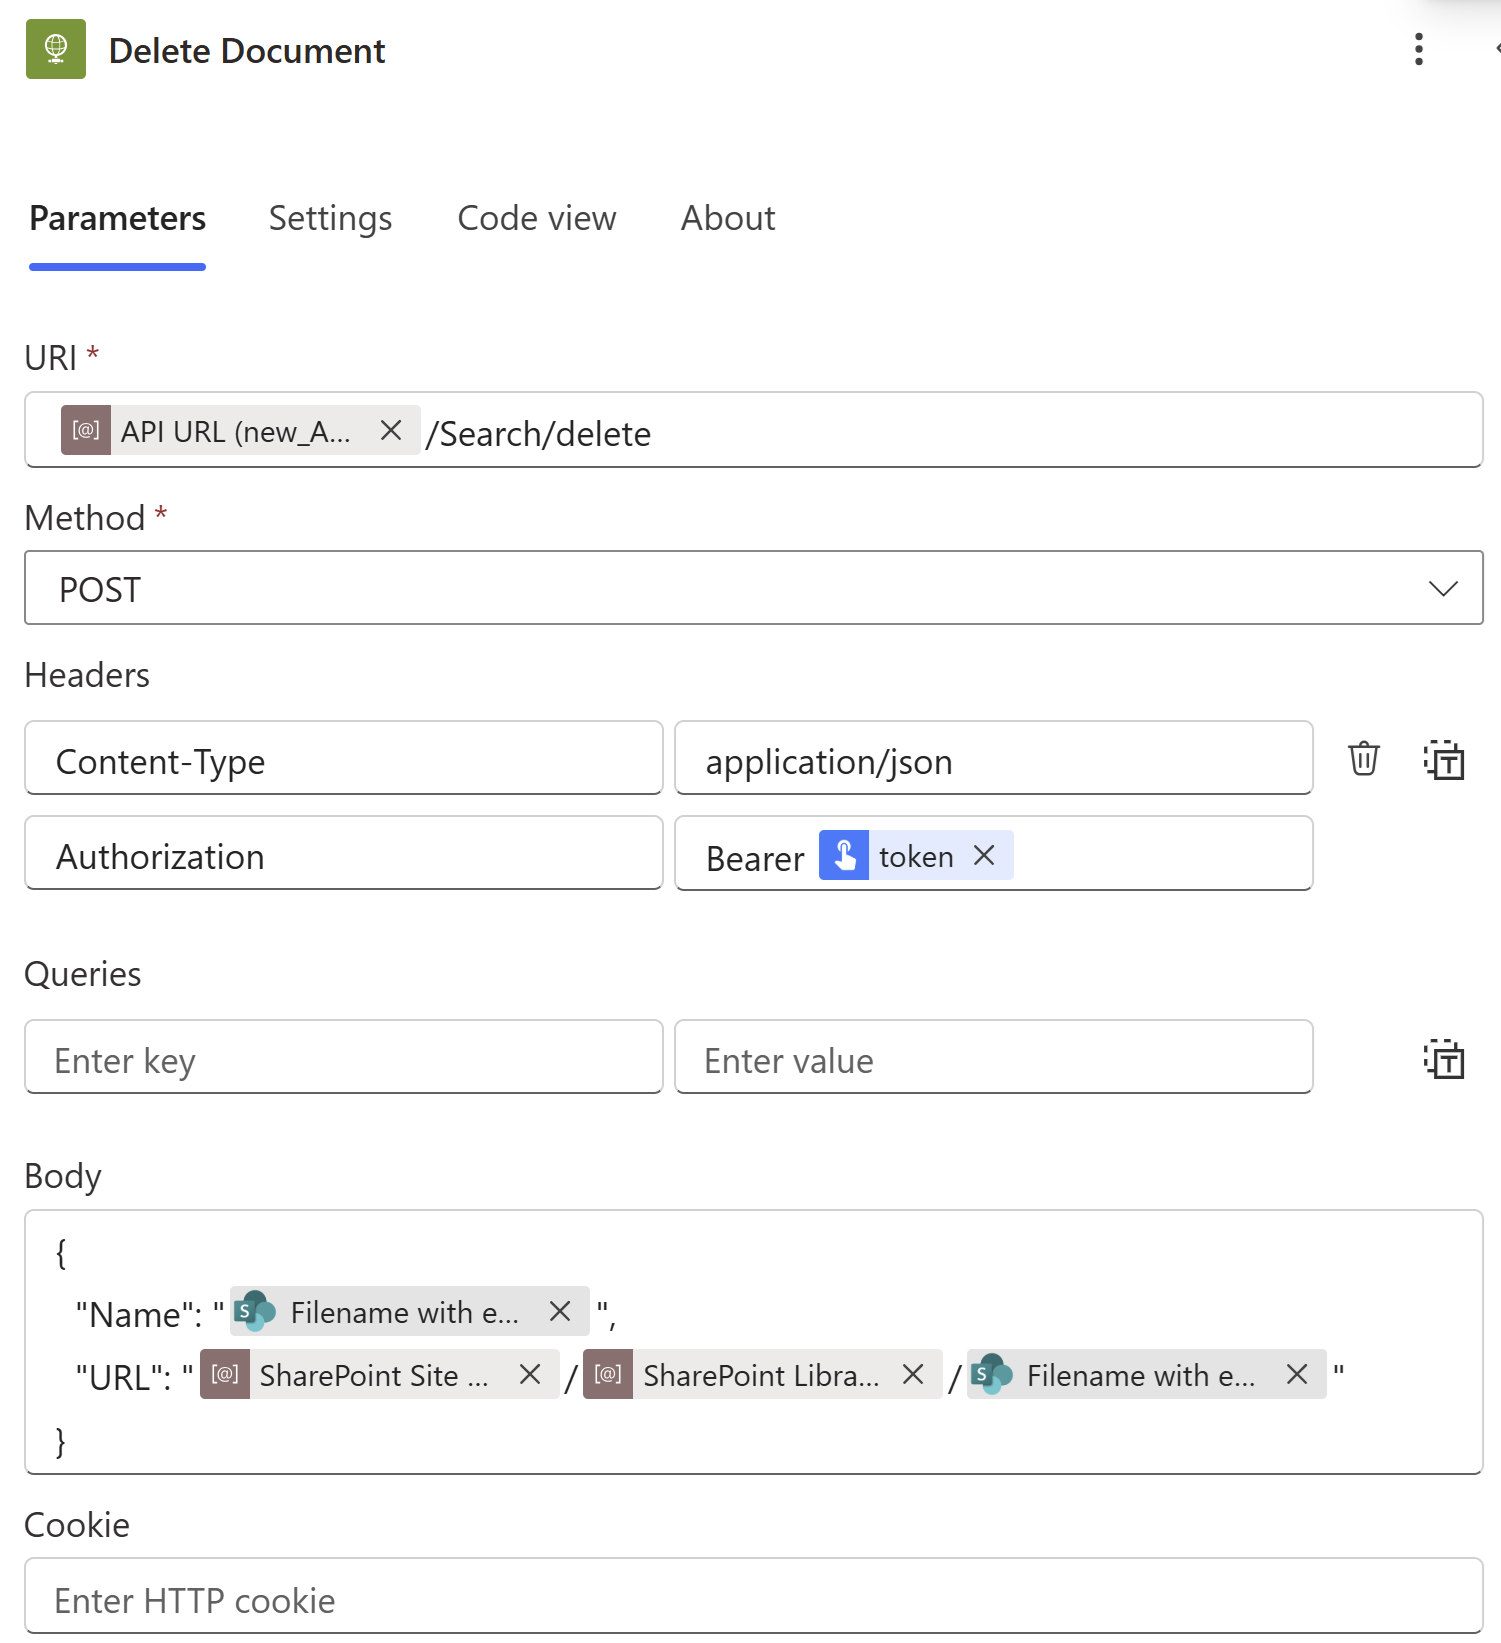
Again, the same three environment variables are serving the same purpose, and the same token acquisition is used to authenticate against the “delete” endpoint; the “Body” field, however, looks obviously different. The limitation I alluded to earlier is around the fact that SharePoint deletion triggers surface very sparse metadata:
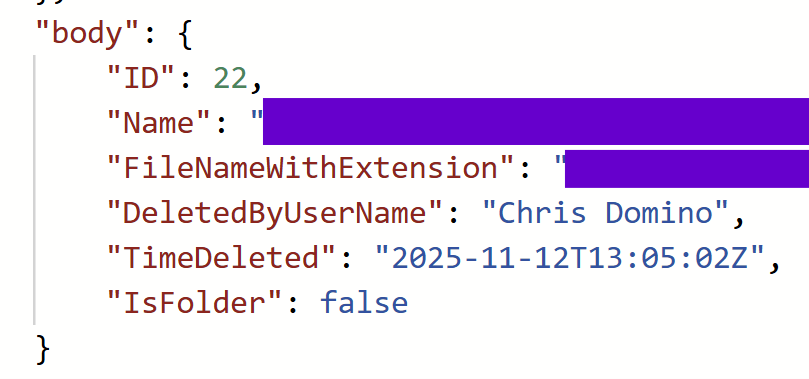
This is from inspecting the “Show raw outputs” of the deletion trigger of a previously executed flow. SharePoint doesn’t even give us the user’s email address! Fortunately, all we really need is the filename (again, with extension), since SharePoint flows target a specific library in a specific site. This is enough information to reconstitute the file’s URL (leveraging reused environment variables) so the API can ultimately find and purge it from the Azure AI Search index, which is why it was included as part of the ingestion flow in the first place.
Don’t come up for air from this first deep dive just yet! The next post in this series will stay beneath the surface of this mountain spring and discuss the API on the other end of the wire that these flows call. The air is getting thinner, but this series gives you the proper gear to continue confidently climbing AI mountain.
.svg)