

Series Overview
This is the third post in this series, where we embark on a different journey up AI mountain. If the pros and cons of the “The Easy Way” verses “The Hard Way” as discussed in the series introduction compel you toward the latter for your organization, then you’re in the right place. The custom architecture introduced here works around licensing requirements with the tradeoff of necessitating Power Platform, custom code, and an advanced Azure AI Search topology.
Without having a lift pass, we throw our skis over our shoulders and head out the back door of the lodge to take the longer, more scenic route upward toward achieving Microsoft Foundry agents reasoning over SharePoint data. Here we formally define what I affectionally call “The Hard Way” with follow up deep dive posts that elucidate the technical details. Use the table of contents below in case you want to explore other posts in this series.
- Tradeoffs Between the Two Approaches
- SharePoint Knowledge Connections to Foundry Agents the Easy Way
- SharePoint Knowledge Connections to Foundry Agents the Hard Way
- Azure AI Search Knowledge Connections to Foundry Agents
SharePoint Knowledge Connections to Foundry Agents the Hard Way
The biggest advantage of any custom solution is that it puts much more configuration into the hands of stakeholders, administrators, and engineers. The Easy Way is the “out of the box” approach, but also the “black boxed” one. Any fine tuning of your SharePoint agents happens at the “top layer” leveraging Microsoft Foundry functionality. The Hard Way is more effort, with the payoff of having visibility into the “bottom layer” of the data: security, chunking, and vectorization are all knobs on the control panel.
Let’s climb!
The Architecture
As a high-level reference, here is a diagram that shows the architecture behind this approach. This is the basecamp from which we begin our ascent, following the flow of data from SharePoint to Azure AI Search step by step and component by component.
- Purple arrows: data ingestion flow
- Red arrows: data deletion flow
- Gray arrows: inter-component dependencies
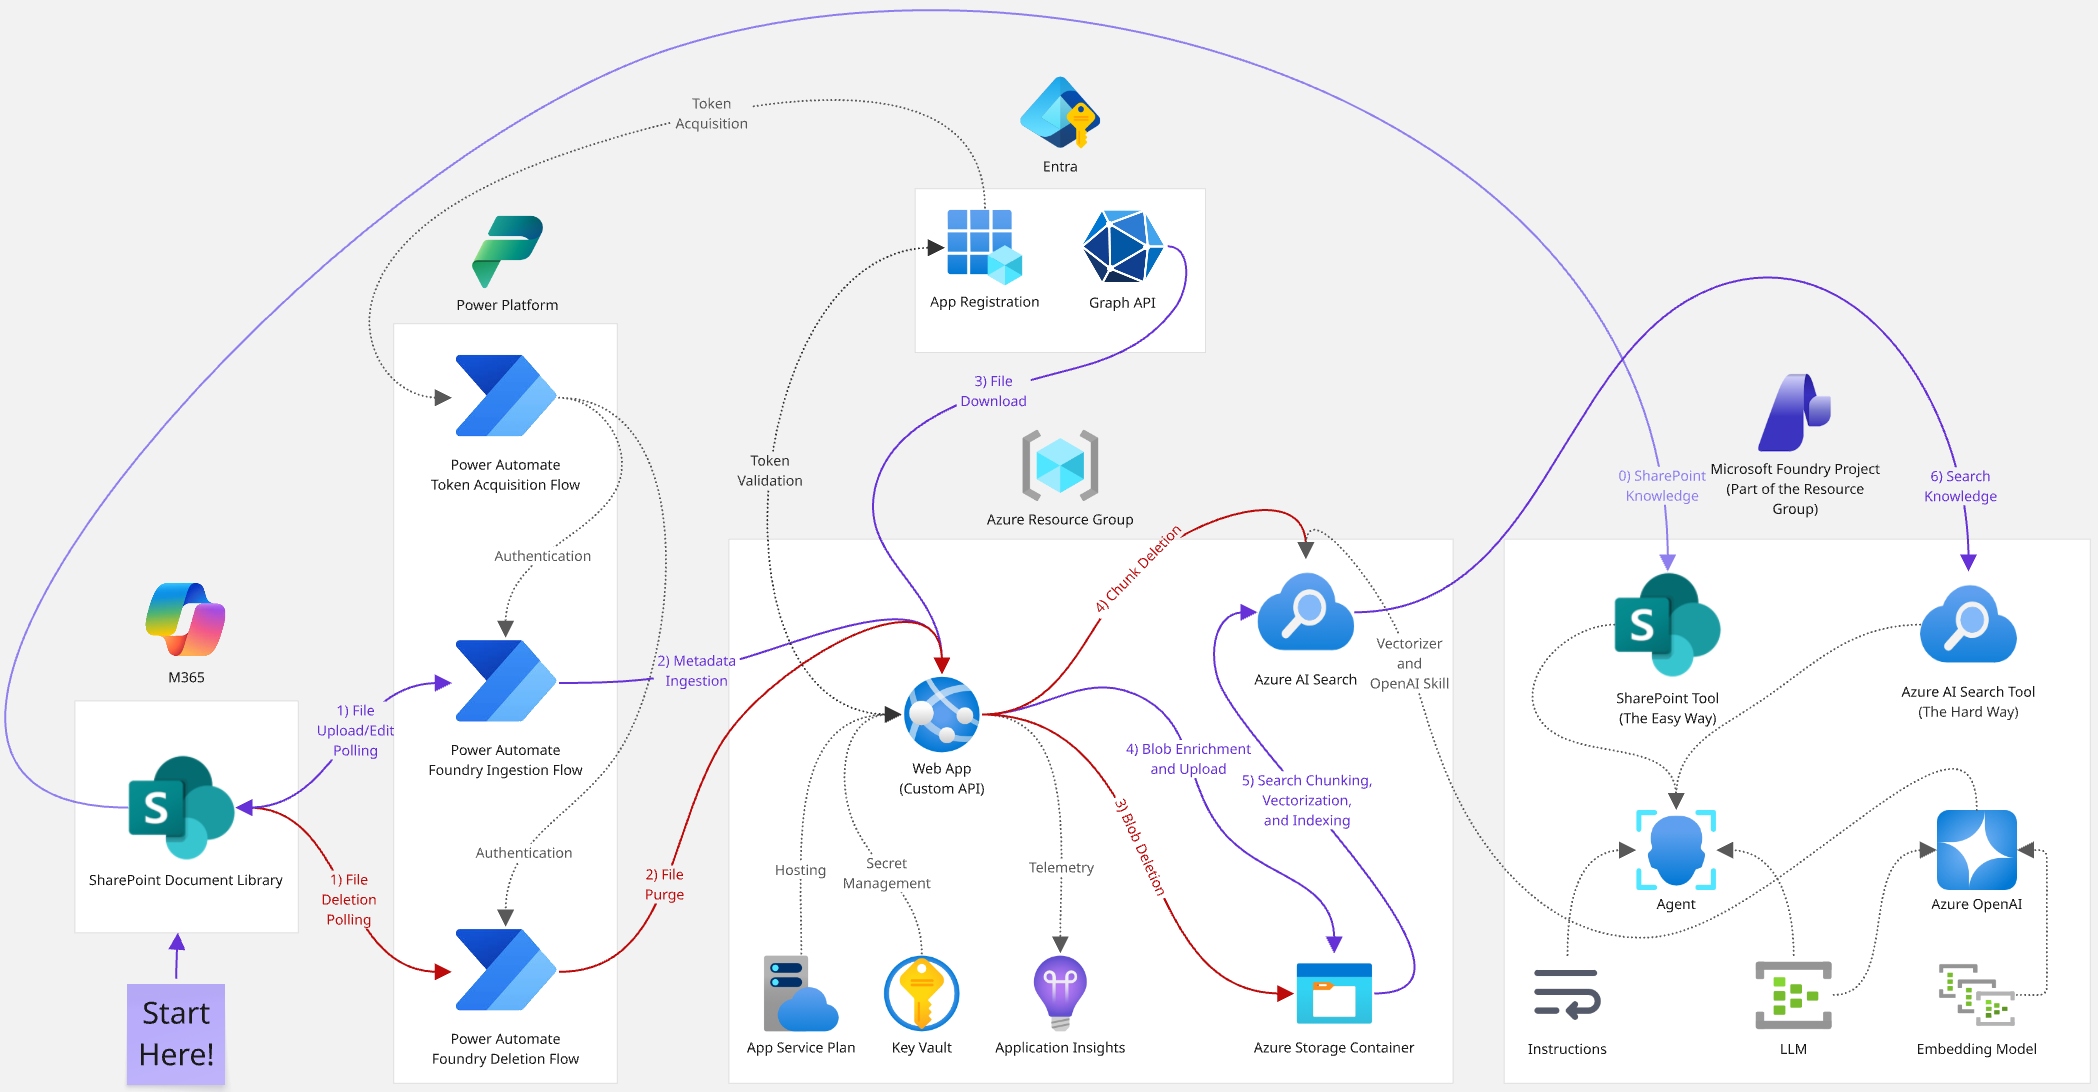
The deep dives mentioned above will be broken out into Power Automate flows, the custom C# ASP.NET Web API, and a fully deployable Azure AI Search topology. This post will detail some of the ancillary technical components that can be explained more succinctly. But in general, here are the tents we’ll pitch on our way up following the mountain stream of data:
- SharePoint: the process begins by uploading a file to a document library -> see the “SharePoint” section below.
- Power Automate: this triggers a flow that sends the file’s metadata to our API -> see the first deep dive in the table of contents above (deletions will also be discussed here).
- Web API: an endpoint processes this data and uploads it as a blob to an Azure Storage container -> see the second deep dive in the table of contents above.
- Azure Storage: blobs are adorned with custom metadata and stored here so they can be easily indexed by Azure AI Search -> see the “Azure Storage Container Blobs” section below.
- Azure AI Search: this chunks and vectorizes the blob using Foundry + Azure OpenAI and translates it to robot language -> see the third deep dive in the table of contents above.
- Microsoft Foundry: an agent with Azure AI Search knowledge reasons over the SharePoint data -> see the final post from this series in the table of contents above.
SharePoint
At the base of the mountain is of course the data source, which in this context is a SharePoint document library. While this integration can easily support a custom content type with additional file metadata that can be ingested and indexed, we’ll get out of the gate with the trusty default SharePoint “Document” which only has a file name and the standard audit fields. Note that another advantage over the Easy Way is that there are no restrictions on the managed path of the target site collection; the default /sites URLs will work just fine.
There’s really not much else to do in the data layer other than identifying a target document library to make available to Foundry, and ensuring your users have at least read access to it. The triggers for the flows we’ll discuss in the first deep dive are aware of SharePoint, but not the other way around. In other words, administrators don’t have any configuration to worry about here at the start of the journey upwards.
Azure Storage Container Blobs
Architecturally, there is nothing novel about the role of Azure Storage blobs; you just need a private container and its connection string. I chose this approach because of its rich integration with Azure AI Search, allowing automatic ingestion and indexing, and then without having to climb much higher, chunking and vectorization.
An “Even Harder Way” up the mountain I experimented with (and abandoned) was sending the SharePoint file contents to a Foundry Document Intelligence endpoint and using that to chunk it up myself before sending the resulting vectors to Azure AI Search. That felt like reinventing the wheel with nothing but a tree and an axe given that the blob approach was comparatively out of the box. At the end of the day, for this particular AI data use case, an architecture with more complex configuration won out over one having more complex logic.
Therefore, I’d like to discuss some additional nuances around using blobs as a sort of “vectorization incubator” for my SharePoint files. In more conventional Azure (non) AI Search customizations I’ve created in the past, I’ve been able to leverage built-in change detection and index record purging via its native support for Azure Storage data sources. However, since we are using chunking, there isn’t technically a one-to-one correspondence between blobs and indexed search documents.
To confirm this, after manually deleting blobs from the container and kicking off the search indexer, I never observed anything being purged from the index, necessitating the file deletion flows, endpoints, and logic we’ll cover in the first two deep dives. However, I was able to get the automatic change detection working (see the third deep dive). Since Azure Storage maintains a timestamp for all blobs, we can easily enrich our Azure AI Search data source to leverage this mechanism.
The last thing to say about Azure Storage is that I take the liberty of assuming we have a single SharePoint document library synced to a single Storage Account container vectorized within a single Azure AI Search index. If you’re using custom SharePoint content types, you could easily add blob metadata mapped to additional search fields that capture the site collection id, document library drive, etc. to achieve one search index covering an entire M365 tenant’s worth of content if desired.
But depending on the breadth of your files, perhaps this context is too broad for useful chat completions. Since Azure AI Search knowledge tools pair an agent with a single search index in a Foundry project, your organization can lean into this somewhat natural 1:1 correspondence. This would yield specialized agents querying indexes that explicitly cover a single document library. Once again, this custom architecture gives you plenty of options to tackle many enterprise data scenarios.
Entra
Another component of our climb is the architecture’s security layer, which, given our Microsoft tech stack, means an Entra ID app registration is inevitably required; we need to vigorously protect the internal data our Foundry agents consume. The main role this app plays is issuing tokens that secure the endpoints of our API. (Note that this isn’t SharePoint security.)
There is nothing bespoke about this app, so I will quickly scale this foothill as the mountain steepens and the temperatures fall. The API permissions might vary based on your specific environment, but for token issuing, we only need the basic delegated OAuth ones (the guids below are handy if you are scripting the provisioning of your apps via Azure CLI):
- openid (37f7f235-527c-4136-accd-4a02d197296e)
- profile (14dad69e-099b-42c9-810b-d002981feec1)
Depending on your requirements, these might also be useful:
- email (64a6cdd6-aab1-4aaf-94b8-3cc8405e90d0)
- User.Read (e1fe6dd8-ba31-4d61-89e7-88639da4683d)
This app will additionally be used in the second deep dive to authorize Microsoft Graph access to SharePoint files via OneDrive. Before you request admin consent, you’ll need the Files.Read.All (application for this one, not delegated) permission (01d4889c-1287-42c6-ac1f-5d1e02578ef6) which lets it download any file. Depending on your organization’s governance, this might be too much visibility; it allows code with the client secret to peek into confidential SharePoint sites, private Teams channels, and personal OneDrive folders.
If this is indeed untenable for your security team, we’ve hit an ice patch on our climb up the mountain; some additional tools need to be pulled from our backpack to navigate this slippery terrain. First, instead of Files.Read.All, get admin consent to Sites.Selected (883ea226-0bf2-4a8f-9f9d-92c9162a727d) (also not delegated) which grants access to all files residing only in SharePoint sites to which the app is explicitly granted access.
Here is an excellent deep dive into the relatively new “*.Selected*” set of Microsoft Graph permission offerings. When we look at the code on the other side of the wire in the second deep dive, these two approaches will be referred to as “Most Privileged” and “Least Privileged” respectively.
Second, to make SharePoint aware of this app, we need to configure its rights to a specific site collection. This is possible to perform via Graph with a different "admin" app having Sites.FullControl.All (a82116e5-55eb-4c41-a434-62fe8a61c773). Microsoft justifies this intense level of application access here. That payload looks like this:
1. POST https://graph.microsoft.com/v1.0/sites/<site-collection-guid>/permissions
2. {
3. "roles": ["read", "write", "owner", "fullcontrol"],
4. "grantedToIdentities": [{
5. "application": {
6. "id": "<app-id>",
7. "displayName": "<app-name>"
8. }
9. }]
10. }
You can choose any combination of the permissions listed on Line #3 above. For this Foundry data ingestion use case, we only need read. If this feels like trading one privileged access for another, let me show you another way. PnP PowerShell has been noticeably absent from all this SharePoint talk, so if you are a site collection admin or have the “SharePoint Administrator” role in Azure, here’s a more Human approach:
- Fire up PowerShell 7.
- Install the PnP module and register an app for it.
- Authenticate to a site collection via browser:
Connect-PnPOnline -Url "https://<tenant>.sharepoint.com/sites or teams/<site>" -ClientId "<app-id-from-step-2-above>"
- Grant your app (not the PnP one) read access to it:
Grant-PnPAzureADAppSitePermission -Permissions "Read" -Site "https://<tenant>.sharepoint.com/sites or teams/<site>" -AppId "<app-id>" -DisplayName "<app-name>"
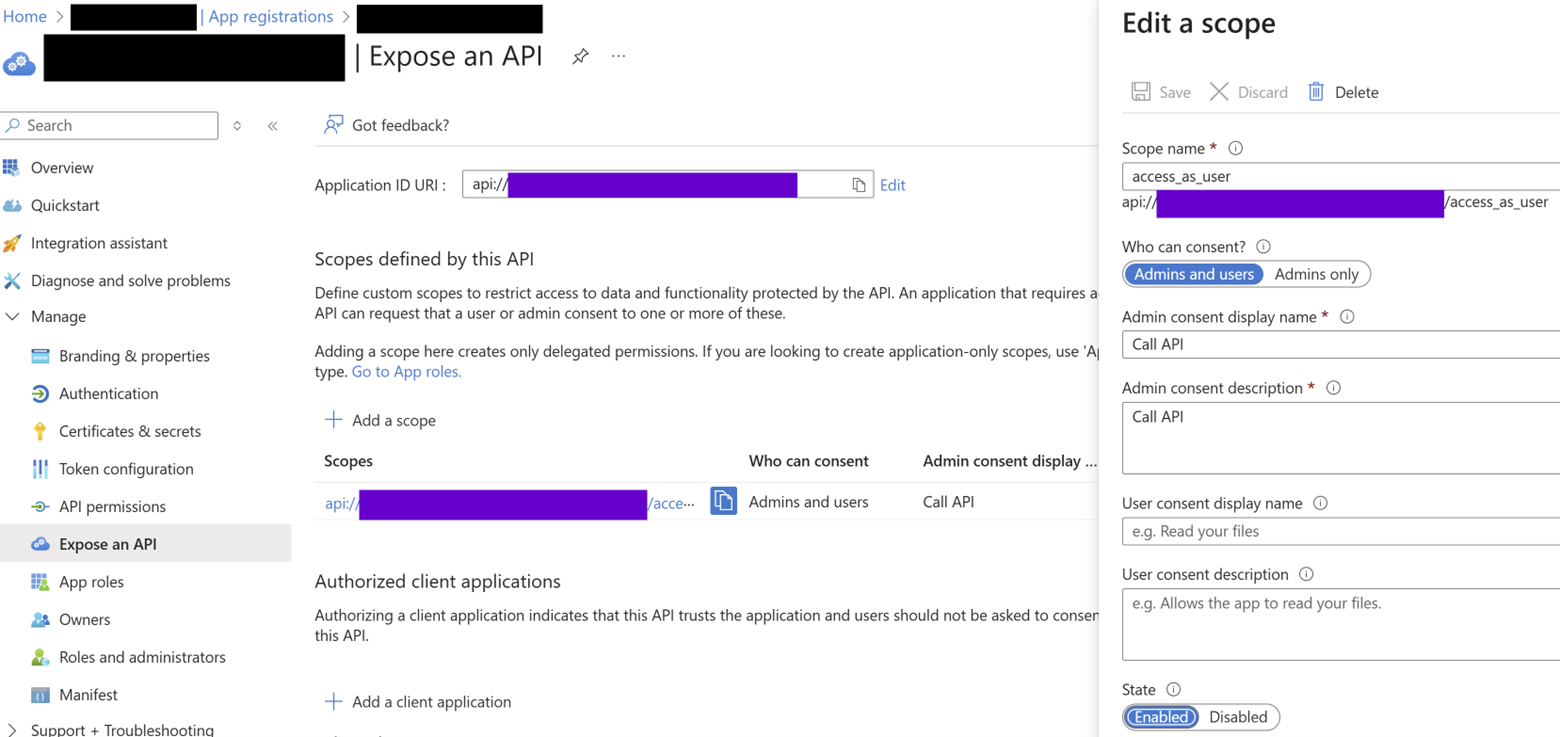
The final security bit to discuss is locking down the endpoints. To do this, expose a scope to allow ASP.NET Core code in the custom API to validate authentication tokens and accept requests from Power Automate flows. Please excuse all the redaction in the screenshot below; the salient bit is that the purple boxes would contain your app id in the scope’s various API URL identifiers.
As will be reverberated throughout this series, I prefer to have as much of my architectures’ logic implemented in C# as possible, so I don’t typically opt for app registrations to leverage implicit grant flows. Coming from a SharePoint background, I take security very seriously and feel more comfortable dealing with tokens and claims manually. Of course, feel free to blaze your own mountain trail here per your organization’s governance.
Token Validation (Optional Extra Credit)
Although not germane to any of the AI bits involved with Foundry agents reasoning over SharePoint data in this architecture, I do want to discuss the custom token validation mentioned above in case you’re curious. I came up with this as fix for a particularly nasty Azure Function authentication problem I faced a while ago, and have now adopted it as my de facto web API security strategy.
Since our app registration is pulling double duty (providing access to Microsoft Graph and issuing authentication tokens to Power Automate against the API’s scope), I thought it would be interesting to show you the code here. This is in the ASP.NET Core Web API project’s bootstrapping Program.cs file: (Note that usings, constants, comments, etc. have been removed for brevity, and the Azure Key Vault integration bits are out of scope. A link to the full GitHub repo is at the end of this post.)
1. Public static async Task Main(string[] args)
2. {
3. TimeSpan tokenExpiration = TimeSpan.FromMinutes(5);
4. WebApplicationBuilder builder = WebApplication.CreateBuilder(args);
5. SecretClient keyVaultClient = Program.AddKeyVaultClient(builder);
6. EntraIDSettings entraIDSettings = await KeyVaultUtilities.GetEntraIDSettingsAsync(keyVaultClient);
7. builder.Services.AddAuthentication((options)=>
8. {
9. options.DefaultAuthenticateScheme = JwtBearerDefaults.AuthenticationScheme;
10. }).AddJwtBearer((options) =>
11. {
12. options.Events = new JwtBearerEvents
13. {
14. OnMessageReceived = async (context) =>
15. {
16. SecurityKey[] signingKeys = await Program.GetIssuerSigningKeysAsync(context, entraIDSettings);
17. options.TokenValidationParameters = new TokenValidationParameters()
18. {
19. ValidateIssuer = true,
21. ValidateLifetime = true,
22. ValidateAudience = true,
22. ClockSkew = tokenExpiration,
23. ValidateIssuerSigningKey = true,
24. IssuerSigningKeys = signingKeys,
25. ValidAudience = $"api://{entraIDSettings.ClientId}",
26. ValidIssuer = $"https://sts.windows.net/{entraIDSettings.TenantId}/"
27. };
28. }
29. }
30. };
31. . . .
The first thing I must immediately point out is the trailing slash at the end of Line#26; without it, validation will cryptically fail. After setting up the conventional JWT defaults and authentication middleware on Line #’s 7-10, I hook the OnMessageReceived event on Line #14, which fires upon a request to an [Authorize()]'d endpoint. Then in Line #’s 17-27, we opt into a very stringent validation scheme where we pat down the request’s token aggressively. Far too many times I’ve seen these variables lazily set to false, which is the equivalent to taping a picture of a lock above your home’s front door handle.
Line #25 sets the audience to the scope exposed on the Entra ID app, and then Line #26 requires the token to come from our tenant as the issuer. But the real deadbolt is requiring signature validation on Line #23. When you are debugging an auth token and paste it into https://jwt.ms, you’ll sometimes see the decoded claims (good) but also an error message indicating that the signature is invalid (bad). Let's address that.
Instead of sharing a private key with all consumers of this API, I leverage the GetIssuerSigningKeysAsync method on Line #16 that calls the Entra ID tenant’s /discovery/keys endpoint and ultimately builds up an RSASecurityKey object used for issuer validation. The keys are then referenced on Line #24.This logic is a bit beyond my cryptographic skills, so I found the inspiration for the code below here and modified it a bit:
1. private static async Task<SecurityKey[]>GetIssuerSigningKeysAsync(MessageReceivedContext context, EntraIDSettingsentraIDSettings)
2. {
3. List<SecurityKey>keys = new List<SecurityKey>();
4. IHttpClientFactory httpClientFactory = context.HttpContext.RequestServices.GetRequiredService<IHttpClientFactory>();
5. string jwksURL = $"https://login.microsoftonline.com/{entraIDSettings.TenantId}/discovery/keys";
6. string rawKeys = await httpClientFactory.CreateClient().GetStringAsync(jwksURL);
7. using JsonDocument parsedKeys = JsonDocument.Parse(rawKeys);
8. foreach (JsonElement key in parsedKeys.RootElement.GetProperty("keys").EnumerateArray())
9. {
10. RSAParameters rsaParameters = new RSAParameters
11. {
12. Modulus = Base64UrlEncoder.DecodeBytes(key.GetProperty("n").GetString()),
13. Exponent = Base64UrlEncoder.DecodeBytes(key.GetProperty("e").GetString())
14. };
15. RSA rsa = RSA.Create();
16. rsa.ImportParameters(rsaParameters);
17. keys.Add(newRsaSecurityKey(rsa)
18. {
19. KeyId = key.GetProperty("kid").GetString()
20. });
21. }
22. return keys.ToArray();
23. }
I am sure there is more out of the box way to achieve full token validation proper, but I have used this logic in the context of Azure Functions, Power Automate flows, ASP.NET Core APIs, and even to secure endpoints called by OfficeJS Excel addins. As someone who finds satisfaction peeking behind the curtains when budgets and timelines allow, I find this to be a rock-solid solution with what turns out to be not that much extra customization effort; is there really such a thing as gold-plating security?
With the architecture in place and some of the supporting components laid out, the foothills are giving way to more rugged terrain. The next three posts in the series will be deep dives into how we pump SharePoint data into Azure AI Search. If you’re only here for the specific Foundry AI bits, then you can skip to the last post (see the table of contents above) where we revisit our agents and imbue them with SharePoint knowledge.
You can find all code for this series here.
.svg)